Modified VO Handlebar/ Camera Bag Setup, Sans Decaleur
My reason for wanting a handlebar bag on a roadbike has to do with photography. I would like to carry DSLR and film equipment on scenic rides in a way that allows me to pause briefly, extract and use the camera quickly, then just as quickly put it away and continue cycling. Having carried cameras in both saddle bags and handlebar bags in the past, I prefer the latter for this task - provided, of course, that the bag is stable and not detrimental to the bicycle's handling. With a handlebar bag, the contents are convenient to access on the bike without dismounting or stopping for too long. I was eager to set up this system on my Rawland Nordavinden, enabling it to function as a go-fast dirt roadbike and camera bike simultaneously.
Having already owned a bike with a functional handlebar bag setup, the concept is familiar to me. On my former Rivendell, I had an Ostrich bag, attached with its native straps to the front rack, and supported at the top with a spacer-mounted decaleur. What I liked about that system was its stability, and the aforementioned ease of camera access. What I disliked about it was the bulk. The bag was larger than necessary. The myriad of leather straps, metal buckles and other appendages added weight. The buckles clanked against other metal hardware on rough roads, no matter how out of the way I tried to position them. And having a decaleur permanently attached to the bike seemed superfluous. But all this aside, using the same setup on my current bike was not an option. My handlebars are too low for the Ostrich and many other production bags. And for reasons too complicated to go into here, using a decaleur, even if I wanted to, would be problematic. So I took this as an opportunity to experiment with a decaleur-free setup. Velo Orange sent me their Campagne handlebar bag to try out for this purpose. This bag is considerably smaller than the Ostrich and just a tad larger than the small Gilles Berthoud. The design is otherwise very similar to the Berthoud. The VO bag's fabric, stitching and leather are noticeably rougher, which is reflected in its price ($110, compared to $225 for the Berthoud).
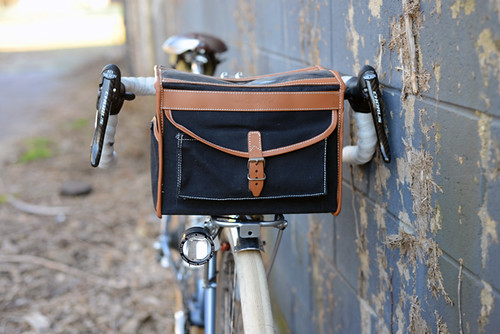
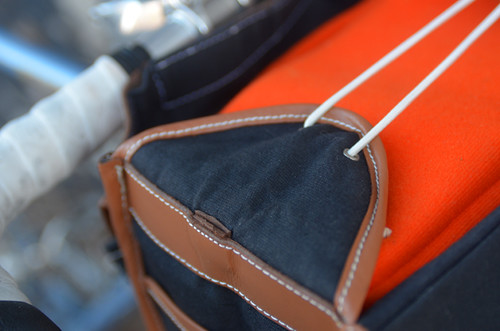
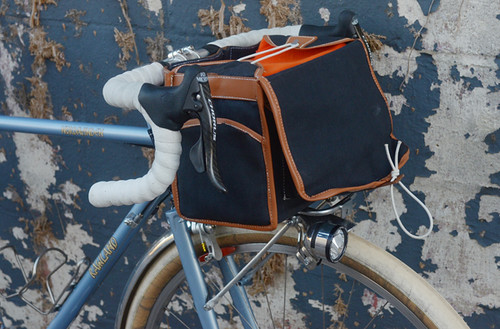
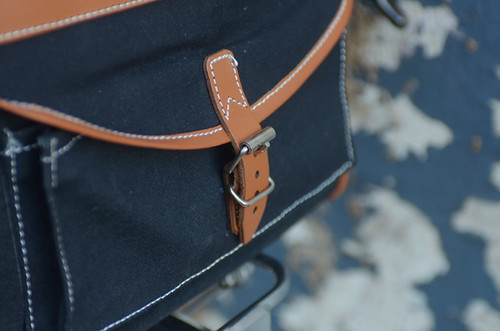
I made a number of modifications to the VO bag. First, I removed all of its native leather attachment straps with metal buckles, of which there were 4: two for the handlebars (you can see them in use here), one on the underside of the bag for attaching it to the center of the rack's platform, and one at the rear for hooking over the rack's "tombstone." Unlike on some other bags, the straps on the Campagne are not permanently attached, but threaded through, so removing them is easy. But I did cut off the D-ring attachments on the sides of the bag: They were stiff and sticking up in a way that interfered with the top flap sitting flush (can be seen here as well). I will extract the remaining bits of leather eventually, but for now it's just a rough cut. Removing the leather straps and buckles made the bag quite lightweight - though there are still metal buckles on the front and rear pockets that I would love to replace with elastic cords, for the sake of convenience.
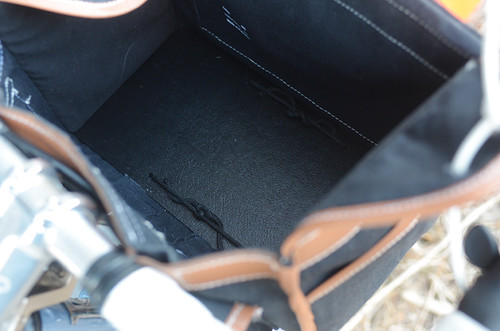
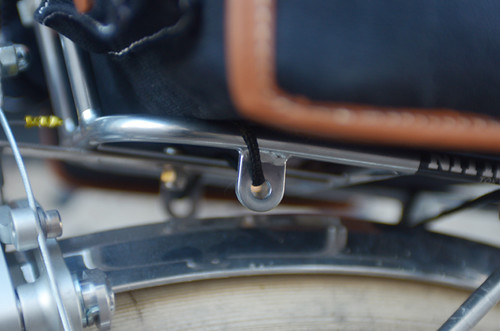
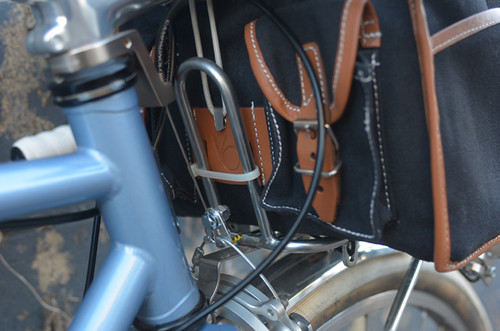
Going for a decaleur-free setup, my main goal was to attach the bag to the front rack as firmly as possible. With the native attachment system, the single strap on the underside of the bag hooks around a central point on the rack. Attached in that manner, the bag will pivot and sway without a decaleur. So what I wanted to do instead was attach the bag to the outside edges of the rack at 4 widely spaced points. There are several ways to approach this, and others have done it successfully using a variety of methods including velcro straps and metal rivets. Here I tried strong nylon cords. My husband used his leather punch to make 4 holes in the bottom of the bag, through the fabric as well as the stiffener. The cords are routed through the rack's light mount/strut eyelets (see below) and tied together tightly inside the bag, as shown.
The design of the Nitto Mark's Rack and similar makes this style of attachment possible. Routed through the eyelets in the rear (and around them in the front), the cord cannot slide along the rack. Mark's rack is a popular front rack, and using nylon cords makes this a lightweight, inexpensive and very easy to DIY method with any small h-bar bag. I should point out that the cords must be of the non-stretchy variety and rated for outdoor use. And if your bag does not come with a floor stiffener, I recommend making one; it will be a much more solid system.
To attach the bag to the rack at the rear, I used a thick zip-tie. With a small handlebar bag, many find that this type 5-point attachment system is sufficient to keep the bag steady without the additional support of a decaleur, particularly when the bag comes with side stiffeners. I too found it acceptably stable.
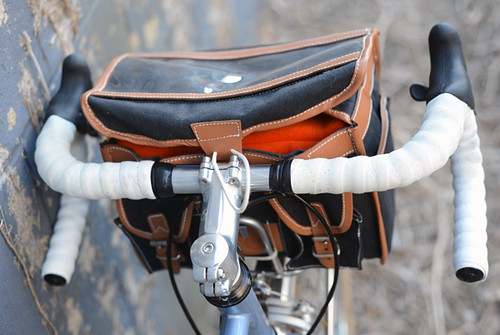
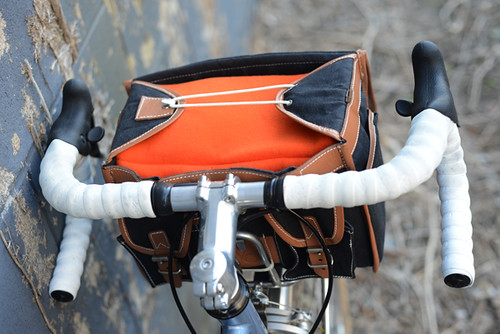
But once I added zip ties to secure the top to the handlebars, the bag felt as if it were nailed in place. This can only be done on bags that sit level with the handlebars, as shown here. In the future I might substitute these zip ties with cords, or thin strips of velcro - the kind used to wrap around bundles.
While I seldom use the tops of the drop bars, it's nice to know that I can. The handlebar attachment doesn't interfere, because the edges of the bag flare out and leave room for my hands. And the bag is narrow enough, so that with my 42mm wide handlebars it does not get in the way of using the Campagnolo shifters. The only downside to this attachment, is that it leaves little space through which to fish the cord when closing the bag, but with my long skinny fingers it is doable. Also, with a threadless stem, this works really well when opening and closing the bag on the go.
While some might scoff at the use of zipties and cords in leu of buckles or velcro, this is the most stable, least wobbly handlebar bag system I have tried thus far. The bag does not budge. And another thing: everything is silent. No rubbing, clanking or jingling noises.
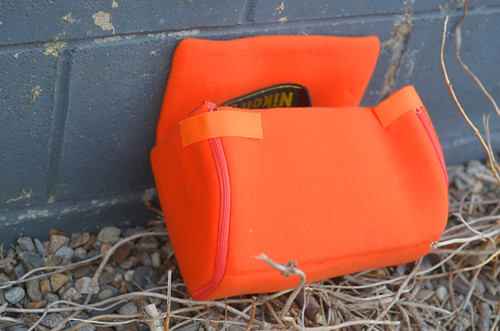
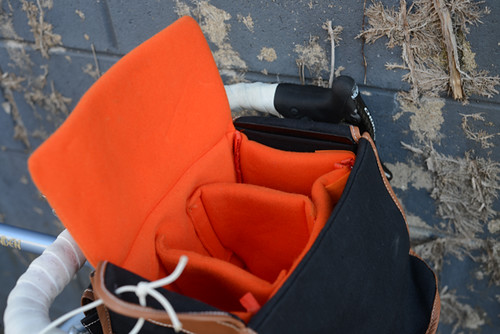
I have a very handy camera insert from Zimbale from 3 years ago, which fits into most of the bike bags I own - including the VO Campagne. I think this insert might now be discontinued, but you can still buy it from a couple of sources (try here). Alternatively, you could look for an appropriately shaped insert at a camera store. There is also Emily of Dill Pickle Gear, who makes custom inserts. Lots of options.
Since the VO handlebar bag closes toward me, I usually position the insert to close away from me, for an extra bit of overlap protection in case of rain or dropping the bike.
Inside the insert are two removable dividers, which makes for up to 3 compartments.
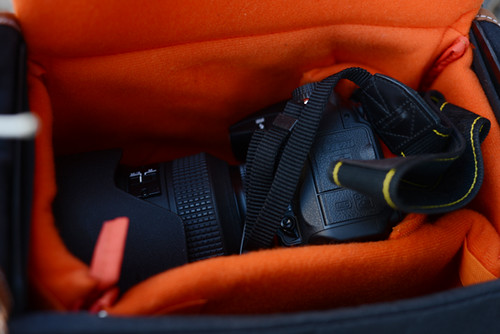
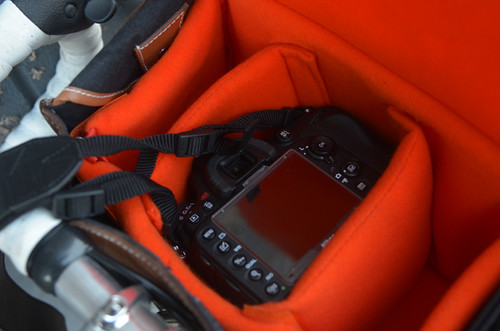
My DSLR with a zoom lens takes up most of the insert.
But with a fixed 35mm or 50mm lens, it only takes up one compartment. I can then store other items in the spare compartments, or remove the second divider to place a medium format camera next to DSLR.
I am very pleased with this system so far. The bag is easy to use, the camera is easy to extract without making a production out of it, and the bag is completely stable despite the lack of decaleur. Cornering, climbing, descending, rough roads, trails - great. I have only ridden with this setup locally so far, but I look forward to taking it on daylong rides out of state.
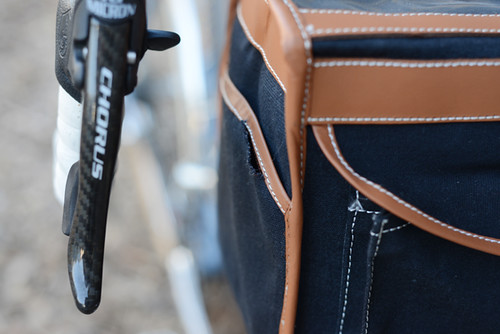
As far as the Velo Orange Campagne bag: It's hard to make judgments about construction quality until you've used a bag for some time, and I have not done that yet. Early on (and before I made any of my modifications), I noticed that one of the side pockets tore - or perhaps was not fully sewn in to begin with - where the fabric meets the leather trim. This prompted me to check all the other seams on the bag. Pulling on them, I have not noticed any defects, looseness, weak threads or fraying. I will follow up if anything else comes undone in use. The bag comes in one colour only, black fabric with honey-brown leather trim. The black fabric has faded a bit in the sun after a few rides, which actually looks nice. Slate blue-greenish. Almost every time I have ridden with this bag, it has rained - but not heavy rain, so I cannot comment on the extent of its waterproofness. Regardless, when using canvas bags I always wrap equipment in a plastic bag when it rains, just in case.
Basically, the VO Campagne bag is a budget-friendly version of the classic French Sologne design. It is a functional bag with a roomy interior, a large front pocket, two small rear pockets and two flat side pockets. Stiffeners (which I like and kept inside the bag), straps, and D-rings are included. The bag is also modification-friendly. And if I were going to modify a production bag, it makes more sense to use something like this than a high-end bag twice the price. In my opinion, the VO Campagne is small enough to set up without a decaleur using a system similar to what I described here. But for the record, VO recommends a decaleur, so experiment at your own risk. You might also be interested to know that Velo Orange will soon be releasing a new, US-made handlebar bag, manufactured by a Maryland sewing shop. Although too tall for my bike, it looks like a great design and I look forward to seeing it in use by others.




An interesting story about your adventures of attaching a low-priced bag to your front rack. Certainly some creative work done there.
ReplyDeleteI checked out the VO bag soon to be on its way. It looks like it could be a good competitor with the Acorn Boxy Rando Bag. I lucked out and purchased an Acorn several years ago (before they became so popular as to become virtually impossible to get), which attaches with four velcro straps on the bottom and a leather sleeve on the back into which the rear upright of a Nitto M-12/18 rack slides. This setup holds the bag securely, but there are also little cord straps on either side which loop over the brake hoods for more stability.
Works great, but again, it's a $200 bag. A decaleur would be nice, but not for an extra $200.
I concur with you, there is nothing quite so convenient as a rack-mounted handlebar bag. Good story.
Did your Acorn come with side-stiffeners inside, or is there an option to use them (internal sleeves)? The Acorns I see on other riders' bikes that are a couple of years old tend to be crumpled, not seeming to retain their shape too well, so I've wondered about this.
DeleteThe Acorn handlebar bag comes with a U-shaped plastic stiffener, bent 90° at the corners, that goes across the bottom and up the sides, where it fits into sleeves.
DeleteIt stays upright even if I don't use the drawcord/D-rings on the sides looped over the brake levers. The very top of the bag is getting a sort of squashed look to it, but when its full of stuff all is fine. To prevent rattling, I lay a folded piece of fleece fabric in the bottom of the bag. I love the bag, except wish it were a tad bit taller. Acorn now offers a "tall Boxy Rando Bag." I'll make do with what I have.
Price aside, what do you think of Berthoud bags? Their selection of styles and sizes is confusing, but they are such beautiful bags. I want one, but can't figure out what size I need and how to attach it!
ReplyDeleteI find Berthoud bags attractive (in gray especially) and they are reputed to be very well made. Great feedback from riders who own them too, years down the road.
DeleteOne thing to consider: Last time I checked, there were no straps of any kind on the bottom of Berthoud bags, so you absolutely must use a decaleur even on the small ones unless you modify them (punch holes in the bottom for rivets/cords, or sew on straps).
Oh and I too am confused by their sizes and styles, and I've been trying to figure it out for over 3 years!
What is so confusing about the Berthoud sizing and attachment? Maybe your readers can help you clarify? Mike Kone also offers to do the same.
DeleteI've had "rando" handlebar bags from Acorn, Berthoud (x2), and Velo Orange. The Acorn and Berthoud use similar quality materials. The VO Campagne bag had noticibly lesser quality materials, although that makes some sense given the price.
For a long time we've used one of these - http://www.sjscycles.co.uk/agu-sport-quorum-525-camera-bag-75ltr-prod633/ with the klik fix mount and horns. We used to carry a small SLR (Olympus OM2), two lenses, a zoom and a wide angle zoom, a small point and shoot camera and a pair of small binoculars. Plus usually, chocolate, maps etc. It could sometimes feel quite bouncy as there was no support other than the horns, but never felt dangerous. We're just in the process of retiring it in favour of an Ortleib
ReplyDeleteLovely Zip Tie - a new blog.
ReplyDeleteFan of their function, not a fan of the practice of the removal/installation/waste cycle. Too much petro-garbage.
Is that brand new tape too? Crazy.
DeleteHandlebar tape? Same as I first put on the bike. Dirty, but you can't tell here.
DeleteZipties yes. I try only to use them on long terms setups.
Awesome.
DeleteI too have struggled with how to effectively carry a DSLR camera and binoculars on my longer rides. I have rear panniers but they're often stuffed with other items leaving little space for camera and binocs. I hit upon a kind of different but related solution to yours. I'm going to be blogging about my own construction on my blog ( www.velocelt.blogspot.com ) I invite you to come check it out. The post should be up in the next day or two once I get all the kinks ironed out. The major difference in my set up is that the entire bag will be quickly removable from the front rack so that the expensive gear can easily go indoors while the bike is locked up outside at a store, cafe, wherever. Anyway, as always I enjoy reading your blog.
ReplyDeleteWhew - not in Russian. Very good April 1 blog!
ReplyDeleteMaybe another story?? How do you like the D600?
ReplyDeleteWell, this is my first full frame camera (I've borrowed others, but have not owned one myself). After my D90 finally died about a month ago, this was the replacement. I am very happy with the photo quality and functionality; intuitive if you're a Nikon user with nothing too crazy to adjust to. And aside from the pricepoint factor, it is the only camera in its class I've tried so far that I can actually wield all day long on a job like a wedding or similar event without breaking my wrists - big plus for me.
DeleteDon't forget that Nikon just provided new firmware for the D600. I just did the updates for my D7000 and my wife's D3200, today. My wife likes the D3200 because it is much lighter than both the D7000 and D600. Due to the weight, I was surprised that you were using the D600.
DeleteThere's also nylon R-clips, available at any hardware store for pennies each. Punch a tiny hole in the bottom of the bag for a short screw to thread through, and it locks the bag to the clip, which itself if clamped to the rack. Rock solid. I secure my bags this way. Two R-clips and a zip-tie over the tombstone and the bag is rock solid. I've ridden two D2R2s and too many rough trails to remember, and never once has the bag become destabilized.
ReplyDeletelove my VO Champagne bag...you've given me some ideas to improve the attachment/securing
ReplyDeleteNo one has mentioned the Velo Orange rack with integrated decaleur. I use one with an Acorn bag on my Velo Orange mixte. Rock solid and the bag is easy to install and remove. Expensive compared to the DIY option and it is a little heavy but works the best of anything I have tried yet.Room for camera, binoculars and fun stuff in front with the tools and practical things in a seatpost bag. For shorter rides I use just the seatpost bag.
ReplyDeleteI like this rack concept very much, but it is compatible with very few frames other than those made by VO, or custom ones where the braze-ons have intentionally been placed to fit the rack. There can also be some brake clearance issues. Here is a modified version on the frame I made at ANT Mike's.
DeleteThe VO rack with integrated decaleur should hold up well if you only ride on tarmac, and if the load in your handlbar bag is reasonably light (I'd say 5 to 6 pounds should be fine). Otherwise a serious design flaw will be make the rack fail over time: The tubes that form the decaleur receiver are rather small in diameter, and they are attached to the rack's platform by tiny welds. When riding offroad or on bumpy roads with a (heavy) bag attached to the rack, the movement of the bag combined with the rack-mounted decaleur receiver acting as a long lever will make the decaleur receiver snap right above the welds.
DeleteI have seen this happen in person, but also remember JH's reports about similar rack designs failing during BQ bike tests.
I wonder why a guy that quick with the torch didn't add two small arms reaching downwards to the brake pivots instead of replacing that not-so-pretty flat strip of metal. Not only would the rack attach to the fork more securely (using Paul's double-sided bolts), it would also look more appealing.
DeleteI'm in the process of building a custom fork for a brevet bike, and will probably modify a VO Randonneur rack in a similar way. The brakes are Paul Racer Mediums, so rack strut clearance may not be an issue, but I already have the double-sided bolts and want to use them. ;-)
I second the recommendation for the VO integrated rack/decaleur. It takes the height of the bag out of the equation. Also, stretchy cords looped through those D rings you cut off and the handlebars will provide side support and eliminate the use of zip ties. I really hate zip ties because without scissors you cannot remove the bag.
ReplyDeleteI'd suggest putting grommets or some other form of stress relief in the eyelets on the rack that you've run the nyloin cord through. Whatever the cord you use, movement when you ride (especially on rough roads) is eventually going to cut through the cord.
ReplyDeleteNice setup, Constance, with good protection and easy access. Well done. I would carry a Sony point-and-shoot tucked away in the elastic band under my saddle bag. Then one day I hit bump, and heard the camera hit the asphalt behind me. Ouch. Yours is way better protected. Have fun with the full-frame camera.
ReplyDeleteOh, another way to secure the bag to the tombstone without even using a clip or zip-tie is to just design the top flap closure such that you can use the shock-cording to loop around the tombstone. Thus when the flap is closed, the bag is pulled down onto thee rack by the tombstone. If you look closely at this picture (large size) you can see how the shock cording loops around the tombstone. There is nothing else holding this bag on at the rear of the rack!
ReplyDeletehttp://www.flickr.com/photos/7516215@N03/7747247548/sizes/k
That's an interesting way to anchor the top of the bag as well, especially on bikes where the bag sits well below the bars.
DeleteA better shot of this setup:
ReplyDeletehttp://www.flickr.com/photos/7516215@N03/7747403034/sizes/h
Your bike must be tiny, because that bag looks huge!
ReplyDeleteI was thinking the same :) If this bag is similar to a Berthoud small, I am glad I held off on my Berthoud order!
DeleteI wouldn't say it's tiny. 540mm top tube, 130mm headtube (including extension). But then a lot of the guys whose "classic rando" type bikes you see online are 6' tall and riding enormous frames, so their bags do look smaller.
DeleteLisa - If you measure from your front rack's platform to your handlebars (at the point where they intersect with the stem), that should give you an idea of the bag height you need.
And FYI, these are the shortest production bags I know of (in the rack-mounted/ rando style):
VO Campagne: 20cm tall
Acorn Boxy Rando: 20cm tall
Berthoud No22: 19cm tall
Swift Ozette: 18cm tall
For another option of camera inserts, try Crumpler, I found one for my Berthoud 25 bag and it fit perfectly. Any suggestions for silencing the leather strap that goes over the rack tombstone? It drives me crazy. I have tried tighter and looser to no avail.
ReplyDeleteAny reason you chose to zip tie to the tombstone rather than sliding the leather patch over it?
ReplyDeleteI wondered this as well.
Deletesweet style, I love the idea of handle bar bags
ReplyDeletecheers
steve
Very nice; I can appreciate your creativity.
ReplyDeleteI may be one of the few people who haven't had such luck with the Campagne bag. I've used mine almost daily since last fall and it's looking much worse for wear. The 'inserts' that hold the side stiffeners have ripped and frayed away, and I'm starting to have some fraying of the leather as well.
As you have said, this bag is a mere 40% of the price of a Berthoud. In hindsight, I wish I had sprung for the Berthoud, as I can't imagine the Campagne making it to 2015.