
Finishing What You Started

"The hardest part of this for beginners is usually the cleanup," Mike said at the start. "It's a lot of filing. That's what breaks people."
"Oh," I said. "Well, that shouldn't be a problem. I've done filing."
Going into this, I was worried about many things. The measuring, the cutting, the alignment, the brazing. But filing I could handle. I thought back to my days of intaglio printmaking (etching on metal plates). The person who taught me insisted that everything had to be done from scratch and manually - from cutting sheets of metal to preparing the plates. The latter involved beveling the edges at just the right angle, then endlessly filing, sanding and buffing them until the bevels were perfectly even and smooth, polished to a mirror finish. His insistence on this level of prep work had more than a few students in tears before we even touched ink or got anywhere near the press. But for some reason I stuck with it, eventually got the hang of it, and continued to use this method after I began to work independently. It just didn't feel right to do it any other way. Now whenever I see an etching, I can't help but look at the edges in search for file marks. All of this is to say, the prospect of filing for hours did not frighten me.
So how do I explain what happened a week ago? I don't want to exaggerate it into some dramatic melt down, but it was certainly a low point. A very long day, throughout the course of which I grew increasingly quieter and less bouncy than I had been up to that point. This was supposed to be the last day. So maybe it was the discrepancy between having believed I was almost done, and discovering more and more little things needing to be finished. All these little things added up, and taken together amounted to a lot of work. Bridges, bottle cage mounts, eyelets, braze-ons for cable routing. I had been awake since 5:30am. By 5:30pm, I was so tired that I had a hard time focusing. By the time we mocked the whole thing up to make sure the wheels, tires, rack and brakes all worked together, I was no longer fully present. At this stage we decided that the frame was finished - "good enough." But the feeling of satisfaction or at least catharsis that I had expected at the end did not come.
At home later that evening I did nothing and thought of nothing, feeling utterly dejected. It wasn't until the following day that I could even get myself to look at my pictures of the finished frame. And then I finally felt something: panic. "Good Lord, how could I leave it like this? This is not finished!" I could see smears of brass and silver. If I zoomed in closely enough, I could make out uneven surfaces. I had filed away at these areas, but apparently not enough. Mike had been right: like most first timers, I had flaked out on the cleanup. With horror, I imagined him powdercoating the frame as it was, uneven shorelines and all. Or, worse yet, putting the finishing touches on it himself, whilst chuckling "I knew the finishing would get her!" So I phoned him, trying to stay calm. He had not powdercoated the frame yet. And yes, fine, I could come over to continue working on cleanup. This put me in a fine mood. I showed up bright and early on a Friday morning full of energy.
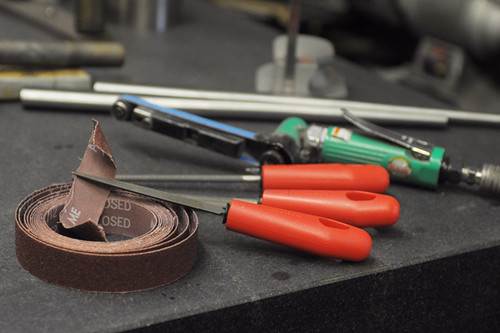
Somehow I maintained that energy for an entire day of using nothing but some files and emory cloth strips. All I did from 9:30am until 5:30pm, with a break for lunch, was file and sand, and it was tremendously satisfying. I guess having reached that low point my previous time at the shop, there was nowhere to go but up.
Mike had to go out for much of the day, and I was mostly on my own working on this. Not being able to seek feedback (Does this part look even? Did I file too much in this spot?) added a new layer of excitement to the process. When he returned, I think he was pretty amused by how cheerful I was after being at this for hours.
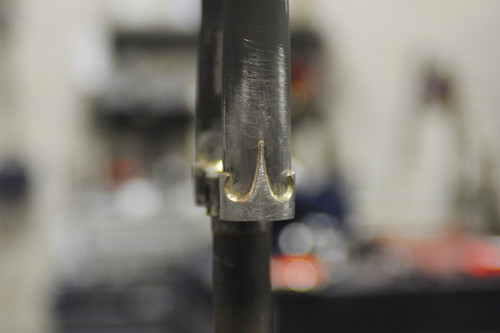
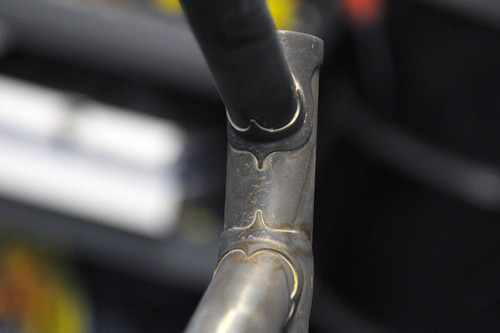
One of the trickiest parts to clean up was the area around the Grand Bois fork crown. Those curly-cues make it difficult to get the file into that little space and chisel away at the extra filler material without gouging the crown or blades in the process. It took me longer to get it to this state from this state, than it did to do the initial post-brazing cleanup. The trick is to dig into the shoreline build-up with the tip of a file, then angle the file just so to lightly and gingerly clean up the rest.
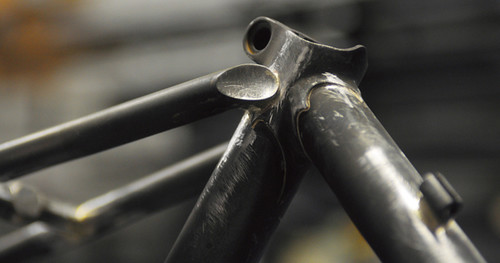
But the most challenging part of all was the seat cluster. My beautiful seat cluster! We made the seat stay caps from scratch to look exactly the way I wanted; it was the coolest thing ever. But during brazing I got a bunch of silver all over the caps, and was now terrified that in cleaning them up I would ruin their perfect concave surfaces. So ever so lightly, I dug into the tiny bulges with the tip of a file, using the most delicate micro-movements I was capable of to remove the filler material but not the steel underneath, then polished with an emory cloth until I got the stuff off. This took a while!
And so it went. The pictures here show the frame close to the point where I stopped, but not quite there. I didn't have the energy for pictures by the time I was done.
If you are wondering about the uneven looking surface from the sanding marks, they disappear after the frame gets sandblasted. The headlugs started out looking like this after brazing, then this, and eventually ended up as you see them above.
Don't get me wrong: The finishing on my frame still isn't "good" by real builders' standards. In fact I would not mind continuing to work on it, but unfortunately we are out of time. But at least now I can live with the state I left it in. And no matter how the bike turns out, I got the feeling of catharsis and closure I wanted out of the process. I learned how to build a bicycle frame (and fork!), from start to finish.
A good lesson and one I'm trying to teach myself and my son:) The big stuff is always easy, it's the little things and the finishing which is tough.
ReplyDeleteI rarely judge an artwork by it's degree of finish (craftsmanship) but something like a 'handcrafted' bike needs that extra touch to make the eye-candy appeal kick in.....Well done!
Great work! I can't wait to see the finished bike. I've never built a bike from scratch, but can commiserate with the attention to detail on restoring several. The difference between good and great is always the detail work. It takes much more time than people imagine.
ReplyDeleteWow... beautiful. If it was too perfect it wouldn't be "Artisinal." It's not like it's something any lug-head could do.
ReplyDeleteCongratulations. As a perfectionist and an artist, I would find it hard to stop or consider it done too. What an accomplishment!
ReplyDeleteLooks good.
ReplyDeleteI think your days of complaining about others' finishing work are over.
Wow, having never built a bike but have done some etching I know exactly what you mean with the filing and sanding... But, wow I must say that your lugs are looking really good. Then again, I never have built a bike (would very much like to), but still. I can't wait to see another update on this frame! What are you planning on brazing on apart from cable holders? Pumppegs?
ReplyDeleteNo pump pegs. Just fender eyelets, front rack mounts and bottle cage mounts. It takes a while, because it all has to be aligned, clamped, brazed, then finished. The bottle cage mounts also require holes to be drilled first. Well, it's all done now.
DeleteI have a boat load of pictures of all of this; just need the time/energy to process, organise and post them all.
Well ... chapeau à vous ... what a fantastic project! And what a tremendous sense of satisfaction and ownership that must bring. I'm impressed, and a bit envious.
ReplyDeleteI know of a frame by quite a famous bespoke maker where one of the fork legs fell out (fortunately while checking for the cause of wobbly steering) - turns out it had only a very light touch of brazing holding it together; so you never really know the potential problems unless you've built it yourself. It must be so good psychologically speaking to know exactly how well the frame is made (and where the weaknesses are if any).
Looking forward to seeing the final outcome. I'm sure you'll make it lovely :)
Whether it's your friend the hobbyist builder, a top builder with a 10 year wait list, or a trusted mainstream manufacturer, the truth is that stuff happens.
DeleteThat said, we destruct-tested the first of these forks just to see how the blades behaved when bent and also how good my braze was. I will post pictures of this soon.
How do you & Mike fatigue-test in such a small shop?
DeleteThe method we used was putting a long pipe-like thing over each blade (I forget the name of this - but I've seen pics of this process on VSalon), then moving it like a huge lever to try to crack or yank out the blade. No matter how much force we applied, all we could do was twist the blade until it was all bent out of shape. But it would neither crack at the crown, nor come out of the socket. Eventually we melted it out carefully to see how much filler material was on the inside of the crown. It looked pretty good.
DeleteNice, I'm impressed with Mike's thoroughness in checking your work.
DeleteCongratulations. That must be a satisfying feeling to know the whole process of frame building first hand.
ReplyDeleteHow are you able to file for such extended periods with your weakened hand condition? The frame looks great to me.
ReplyDeleteThe sorts of things I have trouble with involve moving individual fingers and trying to manipulate/grip small or skinny objects. None of this comes into play when filing is involved. You can see that the file handles are quite fat. I can get a secure grip and the filing motion itself doesn't require dexterity or super grip strength. Basically I am moving my entire hands and arms in order to file something that is stationary, secured in a vise. By the end of the day my arms and back hurt, but my hands are just fine (not counting the scaly fingertips!).
DeletePretty fetching. Isn't it interesting that the last 2% takes 25% of the time? And that there isn't any screechy yellow cordless device one can wave at the problem spots to make them evaporate into a puff of smoke and sparks.
ReplyDeleteIs the relief and satisfaction of finishing something like this to a good, presentable standard something like the feeling of accomplishment those giant Anacondas must get after sleeping off a canoe-full of pudgy, pale prospector/missionary/tourists and all their gear. You feel compelled when presented with the opportunity, and it feels right when you finally finish the process but dang, all that misery in the middle.
Spindizzy
Dremel not an option? Too easy to make big mistakes fast?
ReplyDeleteAnd ditto Gaffer Smythe, how ARE you able to file for hours without your hands crapping out? Once upon a time I spent an entire day painting (NOT my day job), and my hands were tender and limp at the end.
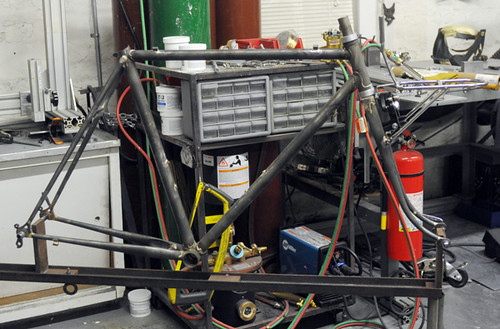
In one of the pictures you can see a hand-hand belt sander. I didn't use it on these last bits of clean-up, but it came in very handy earlier for tasks such as thinning and reshaping dropouts. Otherwise it is too much, too fast, and I imagine a dremel would be the same. For delicate areas, it's better to file manually.
DeleteSee my reply to GS re hands.
I'm thinking maybe a flex-shaft tool with jewelry polishing tips? I am soooo lazy, but love a fine polish.
DeleteI've got a couple of air and electric belt sanders from 3 inches to 1/2" wide, they still only get you to about the 98% mark. You don't want anything that can be finished by machine when you want something really fine. I hope that never changes...
DeleteSpindizzy
Exactly. I loved the little belt sander though; much easier for me to use than a dremel, and perfect for chiseling away at the dropouts, when they needed to be dramatically shrunken.
Delete"Isn't it interesting that the last 2% takes 25% of the time? "
ReplyDeleteThis is so true in every aspect of manual construction, whether it's a bike frame or home construction. There's a manufacturing industry term for this, I don't remember it exactly but it's about building something to satisfy the 95%, and it's generally the rule. The costs for going that final 5% usually result in diminishing returns, which is why we rarely see perfection in design or construction. But for the artisan, or anyone who takes pride in their manual labor, that 5% is everything. Apple is also known for ignoring that 95% rule when it comes to their designs.
"that 5% is everything".
Deleteyes.
nicely done.
Filing is OK but what emery cloth can do is awesome. Not only does it finely polish steel tubing but it'll take your nails down to practically nothing AND gradually (over the course of a few days) remove all your fingerprints.
ReplyDeleteThe bike is looking very good. Nice job!
"AND gradually (over the course of a few days) remove all your fingerprints...
Deletecheck!
Art is never finished, only abandoned. We all are angels with but one wing.
ReplyDeleteThe lugwork is really very nice and will look great after the paintbooth.
ReplyDeleteI remember visiting a custom frame builder in the 80s, who "outsourced" custom lug work to young local bikies. They'd leave with a handful of lugs with machine cut holes and hand file over the course of a week or so to the desired lightly scribed outline. The builder would trade finished lugs for wholesale priced Campy components.
They were were finishing a really pretty white bike with kelly green four leaf clover cutouts on all the lugs for an Irish woman. I was stunned at the filing effort for the lugs alone, didn't even think of the post-braze cleanup efforts.
I cleaned up and polished the lugs before we started, and really enjoyed that part. It's funny, because now I can look at lugged bikes and tell whether the builder/manufacturer got rid of the casting marks or just left them as is. There is a subtly textured look to the surface of the lugs and fork crowns that were used as-is. They are visible under liquid coat but not sure about powder.
DeleteMany who do not understand metal finishing ask me why the cost for a custom bike.
ReplyDeleteThe design, geometry, and brazing all play a part. In the end the finish detail are what make it worthwhile.
Glad to read you got through it. You earned your own little piece of The Agony and The Escasty.
Powdercoat on fine work like this, killing and rounding all jeweler's touch. Have not you thinking of liquid paint onto?
ReplyDeleteDon't mistake what I wrote in this post to mean that the bike looks professionally finished. Powdercoat is the right decision!
DeleteThe ultimate finish is chromeplate. Like shining klieg lights on the surface while a critic holds a pointer. All my non-utility bikes have had some chrome and I've always been in awe of the guys who made them.
DeleteNone of that chrome has been perfect. Most has had plain and obvious file marks. The game is to make it look good even though perfection is not attained.
From what can be seen in first photos V's frame looks good.
Yes, beware the "this is the last day" assessment of any complex project. Unless it's work you've done extensively, it rarely turns out to be the actual last day and risks making you rush, get depressed, or accept "good enough" when you know it should be better. Glad to hear you insisted on reaching a satisfying finishing point.
ReplyDeleteYeah, that was actually the second time it was supposed to be "the last day." We took some detours, since the goal wasn't so much for me to have a bike in the end, as to learn and properly understand every step involved in making it.
DeleteI hope the ride is wonderful. Spring is near. Enjoy.
ReplyDeleteThat's a really fantastic achievement, V, well in. Can' t wait to see it ready to roll.
ReplyDeletebeautiful lugs!
ReplyDeleteLovely Bicycle!
ReplyDeleteWhat are your impressions of welding vs brazing, not from an aesthetic but from a manufacturing point of view?
ReplyDeleteA full answer would require an essay, so topic for a separate post. But quick summary of my impressions:
DeleteThe experience of production is very different. TIG welding is cleaner and "calmer." You are sitting down, not dancing all around the frame and pointing the torch this way and that. There is no messy flux. It almost feels surgical.
Welding requires finer control of the torch, more precision, less subjectivity.
TIG welding is harder to learn and get good at. But once you do get the hang of it, it is easier/quicker to do than brazing.
The bond on a welded joint feels stronger to me than a brazed one.
It is entirely possible to clean up a welded joint (on steel) so that it's smooth with no visible "pools." If a builder so desires, there is a way to make welded joints look seamless.
Overall, I see value in both, and I especially like the way Mike switches back and forth between them when one happens to make more sense for the task than the other.
"Overall, I see value in both, and I especially like the way Mike switches back and forth between them when one happens to make more sense for the task than the other."
DeleteCut by any means possible. - Musashi
The frame looks good.
It is intensely gratifying to get to a point where you know you call your task finished to you satisfaction, isn't it?
The cranky sore fingers relax after a while.
So impressive an accomplishment. Starting to think you're a Renaissance woman. Congratulations! Jim Duncan
ReplyDeleteAll of this is terribly exciting and makes me REALLY want to take a class sometime! Congratulations to you on making your own bike frame!
ReplyDeleteYour first bike , will make a nice story ,like "Divine Rights Trip". Champagne before and after the 1st ride .
ReplyDelete“AND NOW LISTEN: THE RULE OF THE FINAL INCH! The realm of the Final Inch! In the language of Maximum Clarity it is immediately clear what that is. The work has been almost completed, the goal almost attained, everything completely right and the difficulties overcome. But the quality of the thing is not quite right. Finishing touches are needed, maybe still more research. In that moment of fatigue and self-satisfaction it is especially tempting to leave the work without having attained the apex of quality. Work in the area of the Final Inch is very, very complex and also especially valuable, because it is executed by the most perfected means. In fact, the rule of the Final Inch consists in this: not to shirk this crucial work. Not to postpone it, for the thoughts of the person performing the task will then stray from the realm of the Final Inch. And not to mind the time spent on it, knowing that one’s purpose lies not in completing things faster but in the attainment of perfection.”
ReplyDeletefrom “The First Circle” by Alexsandr I. Solzhenitsyn
Congratulations on your frame. It's a beauty. I especially like the seat stay caps -- very nice. I have a couple of vintage frames from the 60s and 70s that have some pretty sloppy welds, especially around the bottom bracket. That's what you get with mass-produced goods.
ReplyDeleteCongratulations on the build.
ReplyDeleteI have always wanted to build my own frame. In fact, there is a gentleman here in my town that offers weekend building course. He helps you design then cut then weld your bike under his watchful eye over a two week end period (8 to 9 hours a day all day Saturday and Sunday).
I also love the unfinished look that shows all the brazing and file marks. If it were mine I would clear coat (powder coat) it and be done with it.
This is really fantastic. I'd love to take some framebuilding classes. I'm more than a little jealous.
ReplyDeleteGreat choice of fork crown, by the way.
I've been following your blog for a while and never knew you took a frame brazing class. I just finished my first frame at UBI Portland's frame brazing class. Mine was a lugged (Richard Sachs Newvex) rando frame with way too many braze ons and now that I'm home, the pain of filing and sanding all of those shorelines bulging with too much silver is rising in my mind.
ReplyDelete