
Staining Your Grips to Match Your Saddle
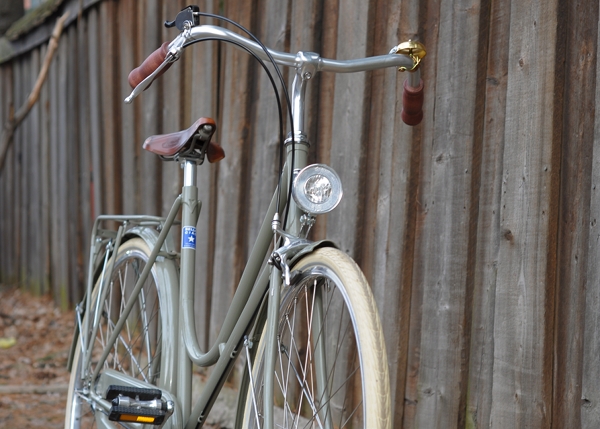
When I showed these pictures earlier, some of you noticed that the cork grips matched the bicycle's saddle and I explained that the grips were stained. Now I've done the same to my wooden grips, and will take this opportunity to describe the process for those interested.
What is staining?
Staining is inherently different from painting, in that the pigment gets absorbed into the surface, rather than sitting on top of it. This means that the natural texture of the material will remain prominent - the cork retaining its corkiness and the wood its woodiness. And unlike paint, stain won't crack.
Where to buy and what kind?
You can buy a small can of wood stain at any hardware store. There are many different kinds to choose from, all of which should work on both cork and wooden grips. I suggest choosing a stain that is oil-based, not water-based or synthetic. Oil-based stains permeate better, look more natural, and are more fade-resistant.
Choosing a colour
If you are looking for a natural colour that will match a brown leather saddle, the main thing is to determine whether your saddle has yellow, red, or ashen (neutral) undertones. For example, Brooks "brown" has a red undertone to it, whereas Brooks "honey" has a yellow undertone. Velo Orange brown leather saddles are more or less neutral. A wood stain that is described as either cherry, mahogany, or redwood, or contains anything "red" in the name will, as you might imagine, have red undertones. A stain that is described as pine, or oak, or contains anything "golden" in the name, will have yellow undertones. A stain described as walnut, driftwood or ash will have neutral undertones. If you are trying to match a black saddle, look for ebony. This basic range of stain colours should be available at most hardware stores.
Applying wood stain
Oil-based stains require ventilation, so you will need to apply the stain in front of an open window or outdoors. Stir the stain inside the container very thoroughly, as the pigment tends to separate and settle on the bottom of the can. Then apply stain to the grips using an inexpensive paintbrush. Apply very thinly. The stain should not be leaking off of your grips and you should be able to see the texture of the wood or cork through it at all times - remember that it's more like a dye than a paint: slowly work it into the surface, rather than attempting to paint with it. Wipe the excess off with a napkin or rag and stand the grips to dry on a newspaper. Don't worry too much if your application doesn't look perfectly even; if anything, that complements the natural variations in the material. There is really not a whole lot you can do to mess this up.
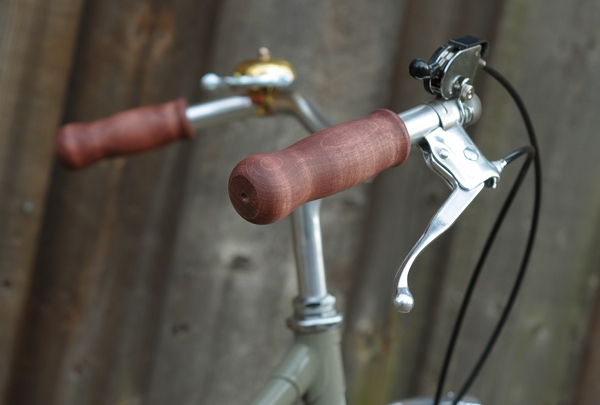
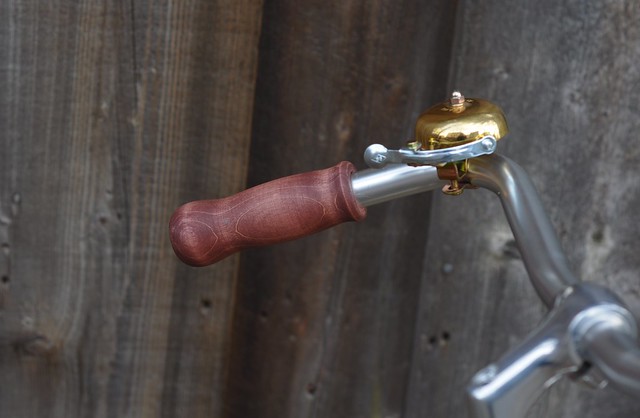
Allow at least 24 hours for the stain to dry, then decide whether you need another layer. For grips, one is usually sufficient. The more layers, the darker and more saturated the pigment will look. If desired, apply a layer of shellac after the stain is fully dry. The wooden grips pictured here are not shellacked, but the cork ones here are.
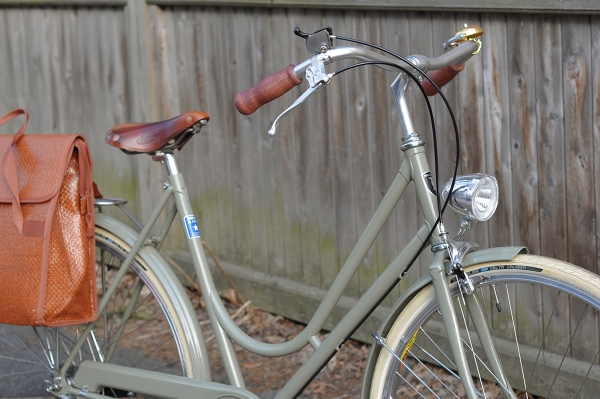
And enjoy your beautifully matching saddle and grips. A pair of plain cork grips will set you back $10, and a small container of wood stain an additional $5. It's a fun and simple way to spruce up your handlebars.
Velouria, I would think that shellack or another wood finish would be a good idea for this wood which will be in contact with sweaty hands. Depending on the type of wood and type of stain, I would expect some of the stain to come off onto hands or gloves, if not coated with another finish. You can get satin or low-gloss finishes like polyurethane (I know, plastic) that are easy enough to apply. You can get stain with finish in one can (i.e. Minwax). And obvously many readers will already have shellack. That said, maybe the owner will want the "beausaged" look. Have you ridden much with the stained wood grips? Steve in MD
ReplyDeleteHow do you stick your cork grips on to the bars? Are they adhered in a way that you can remove them too, if you need to make any adjustments? Mine are now stuck on with strong adhesive for the long haul, so that only cutting off will be my option for removal, as my previous lighter efforts were compromised by the rain.
ReplyDeleteI'd add just one more thing-- staining can cause the grains of the wood to lift slightly, creating a rougher texture than the smooth sanded starting material. Now, some people may like this because it may make the grips more "grippy", but if you prefer the wood to retain a smooth finish, then after the stain has dried you can take fine steel wool (#000 or #0000) and remove those lifted grains. This is par for the course in furniture finishing.
ReplyDeleteI'm going to disagree just slightly, given that I spend a LOT of time discussing wood stain at work.
ReplyDeleteAny stain called "walnut" will actually have a greenish/ cool undertone- what you're calling "neutral"
I literally had a half hour discussion about this with a client last week who was concerned about using a cool undertone walnut stain on a cool undertone white oak floor.
I find that "English chestnut" by Minwax is a good complement for the Brooks brown saddle.
Beware "colonial maple" it is pink-ish which most people don't expect.
I second Cycler's comments on the Walnut stain- they almost always have a cooler green component.
ReplyDeleteSealing the stained wood with shellac, gunstock oil, or a wipe-on poly product is a good idea- it only takes a very light amount to build a barrier coat.
You probably will turn the stained wood grey from exposure to moisture and your hand oils very quickly otherwise.
Any water-based stain will raise wood grain, as Somervillian says.
-Coreyk
Steve - Finishing with shellac is best, but I've been using my grips for two weeks and the stain has not come off on my hands.
ReplyDeleteThe thing is that some prefer a matte finish and don't like the slippery feel of shellac. I think the ideal option is to finish with one thin layer of shellac and replace it every few months as it begins to wear thin. I will probably shellac mine in a bit.
cycler & Corey -You are right about the walnut, sorry about that!
ReplyDeleteI love these DIY articles. Even if I have no plans to try this right now, I might later. Plus it is so much fun to see what is possible for customization beyond just buying stuff off the rack
ReplyDeleteWood grips on a bicycle !?!? That's new to me!
ReplyDeleteMost grips are designed to absorb the road vibrations but that would not happen with wood as much. So why wood?????????
Walt - I find these quite good at absorbing road vibrations! Wood grips were common on antique bikes, and there are some on the market today as well.
ReplyDeleteIt also gives you something to knock on. :)
ReplyDeleteSomewhat off topic, but what is the best tape/shellac combination to match a honey Brooks saddle?
ReplyDelete^ yellow, orange, or natural (brown) tape + amber shellac
ReplyDeleteAs a woodworker I must say, you really should finish over that stain. If you're concerned with the slippery nature of shellac you can always apply it and then scuff sand it with 120 or 220 grit sandpaper or a coarse steel wool like material (works well). Shellac can become sticky in wet weather though, so if you're an all conditions cyclist who ride for hours through monsoons that can be an issue.
ReplyDeleteA marine spar style varnish would also be appropriate, you can get matte finish ones and they have built in UV blockers to preserve your stains color. Same thing with sanding for texture and sheen.
The reasons for finishing are eventually your stain will seep or fade, this is exacerbated by moisture. The spar varnish will prolong the life of the pigment as well and protect the wood from moisture, which given time will cause cracking or checking. The finish will also keep the wooden grips from getting their 'grain raised' when they get wet as someone else pointed out.
Cheers!
Anon @ 12:18 mine was orange cloth + amber shellac. Pics here: Myles.
ReplyDeleteI'll add that I'm a fan of oil wipe on finishes over polyurethane. I usually use Tung Oil, but Danish Oil is a similar product. They tend to be less glossy than poly, and soak into the wood to an extent. I stained my cork grips with english chestnut and finished them with Forsmby's low gloss tung oil. They still have developed a patina from my hands, but I think that's OK.
ReplyDeleteIn terms of securing them, I've actually used thin cork as a shim to keep them stuck on with friction. they still rotate a bit, and it's tricky to get a balance between enough thickness to keep them on, and too much thickness which splits the cork. This is with the $5 style ground cork grips, fancier "whole" cork grips might be stronger.
cycler said...
ReplyDelete"... too much thickness which splits the cork. This is with the $5 style ground cork grips, fancier "whole" cork grips might be stronger."
I recently tried a pair of Rivendell whole-cork grips and was amazed by the difference between those and the regular ones. Wish I'd gotten them earlier. Also, the regular ones are like $15+ now at some shops!
"I'll add that I'm a fan of oil wipe on finishes over polyurethane.."
"On paper", water and polyurethane based finishes sound great, but for whatever reason I consistently find them to perform poorly. Never had a problem with oil-based finishes.
More on matching Brooks "honey": The thing is, that it's not a stable colour, there are variations in tone. I have 3 "honey" saddles and they are all different. But any shade of yellow-ish tape (including orange and brown) plus amber shellac should do the trick, I think.
ReplyDeleteJust so you know, the cork grips are stained in Minwax walnut and finished with amber shellac.
ReplyDeleteThanks! : )
ReplyDeleteI've had good luck using 3M permanent double sided scotch tape for mounting cork grips. The procedure is as follows:
ReplyDelete* cut a piece of tape and begin wrapping the bar from the end
* use concentric circles so that the borders of the tape barely touch as opposed to overlap as you would do with cloth tape
* after you get to where the grip would end, cut your piece of tape and stop
* when you put on the cork grip, screw it on following the rotation of the tape so that it does not push it or bunch it
* put the cork on forcefully and in one motion because if it stays on the tape for more than a split second it will stick
* after you are done, squeeze it tight with your hand and see if it still rotates--it should not
This method is _usually_ removable, but sometimes the glue is too strong and you may damage the cork grip during removal. Otherwise, it gets a little bit wider on the side and you may need two layers of tape on the next use.
Personally, I don't reuse the cork grips, but I know some people would like to.
The best thing about this is that the tape lifts right of the handlebars when the grips are removed, it doesn't require a razor blade and usually the faintest pieces of glue will come off with a cottonball soaked in some lighter fluid or "goo gone."
Uh... This worked for us, but be warned that if the grip comes off, one may crash the bicycle. Don't try this at home? Yeah, that's the ticket.
I should have added that before you use the tape, put the cork grip on and estimate how much friction it has on a dry, glue-free bar. They are not the same and one may require more tape than the other.
ReplyDeleteTo make the tape slightly thicker, you can overlap the borders of the tape as you would with cotton tape. If it requires more than that, something is probably wrong and it will not hold securely with this method.
And yet more on matching a honey-colored Brooks: with age and use it becomes more brown, eventually approaching the out-of-the-box Brooks brown.
ReplyDeleteBy then you can re-stain or replace your grips to match, of course.
YMMV, but I found that once they were glued on and stained/shelacked, my Rivendell cork grips were very hard. No sponginess at all and many friends compared them to a wood grip in terms of how they felt. I did not enjoying riding with them, though I loved their shape. I dropped my bike by accident, and the grip that hit the pavement broke into many pieces and had to be chipped off. Just don't like them, though they are pretty.
ReplyDeleteWood would be more durable, I suppose, but equally hard. And as the daughter of a famous woodworker (as famous as woodworkers can get, anyway), I can't imagine that just staining those grips is going to work well over time. You will lose the color, they will turn gray, and moisture will eventually ruin them. There are many oils that could be used regularly to help prevent this. I'd go to a good "real" paint and varish store, as opposed to Home Depot, and explain what you need. There's certainly some sort of marine varnish that would do the trick, but there are probably several oil options as well. They would just require repeated applications. Put it this way: my dad made me a wooden salad bowl, unstained. We make salad in it, but never add the dressing, and just wipe it clean rather than rinsing it under water. Still, dad says to rub walnut oil into it after every use to preserve the color and shape from the moisture in the lettuce and veggies. Otherwise, it will turn gray and eventually crack. Dad KNOWS, so I do what dad says.
Velouria,
ReplyDeleteI recently did a furniture project and the wood was older and had lots of character, i needed to seal the artwork i was adhereing to the benches so i used a satin finish water-based polyurethane and it worked well, not shiny at all, may try that on your wooden grips, very easy to clean up as well.
I wonder if a trick I use on rubber mtn-type grips will work: Hairspray. Spray on bar or into grip, slide grip on while wet. Once dry, it really sticks. I wouldn't expect to get the cork off in one piece after this method was used. Steve in MD
ReplyDeleteAbout grip adhesive -- I squirt a little 3M spray adhesive inside each grip before installing it on the handlebar. Then I squeeze the grips occasionally over the next 5 minutes, and it's done. No grip rotation, and it's weatherproof.
ReplyDeleteRemoval requires one lengthwise slit with a razor blade, and the grips come right off. Any specks of adhesive on the bar remove easily with a dab of lacquer thinner.
That's the trouble with shellac -- not only does it wear off, it's slippery and brittle, turning pliable cork into something less fun to touch. Yes, it's traditional, but in this rainy climate, I require a bit more performance than shellac can provide.
ReplyDeleteWhile tung oil is very beautiful, I use spar varnish (marine) exclusively on my grips. It's fully waterproof, doesn't wear off, allows me to regulate color and texture separately, is not slippery, and remains pliable along with the cork.
snarkypup said...
ReplyDelete"I found that once they were glued on and stained/shelacked, my Rivendell cork grips were very hard."
I now have a pair of Rivendell and plain cork grips side by side. The Riv grips are a bit harder, which I like, because the regular ones are too squishy for me. It's a matter of taste.
A separate issue is that all grips/ cork tape/ cloth tape get harder the more you shellac them. The first time I shellacked bar tape I made the mistake of overdoing it, and the tape turned into glass as a result; I found it really unpleasant to use.
Also, if you over-shellac the generic, softer cork grips, they become much more prone to cracking, because you've got a rigid crust over a soft core. Squeeze them too hard, and they'll crack. Lean the bike against a wall too roughly, and they'll crack. It's like creme brule.
Linseed oil to seal the grips. Probably you should thin it a bit first.
ReplyDeleteEvery cyclist should have a can of linseed handy. It is frame-saver w/o the spray propellant. Best prep for spoke threads. Makes toe straps last. If you keep shellac or beeswax around get the linseed too.
Since linseed oil is mentioned, I would like to point out that rags soaked in linseed oil have been known to cause fires due to the flammability of the solvents involved. I've read the recommendation to wash and wet them in water and avoid having them lying around or be placed in household garbage where oxidation can lead to combustion.
ReplyDeleteHi Coffee cat. I'm drinking mine now. The quantities of linseed & rags needed to support spontaneous combustion are larger than you'd ever have at home on bike projects.
ReplyDeleteThe smell can be a problem. Same stuff as the flaxseed oil you buy (refrigerated) as a healthy food supplement. Except linseed is room temp & rancid. Some people have trouble with rancid.
For generations the universal drying oil. Always always good for wood, never a problem. Let it get really dry before topcoating w/something else, universally compatible. In, for example, 17th &18th century Boston it would've been the only wood finish. Unless you count a final topcoat of beeswax.
It's the difference in density that causes grain to be raised when stained. If you don't want to raise the grain, you can first apply "wood conditioner". I'm not sure exactly how it works, but it makes the wood absorb the stain evenly across the surface.
ReplyDelete