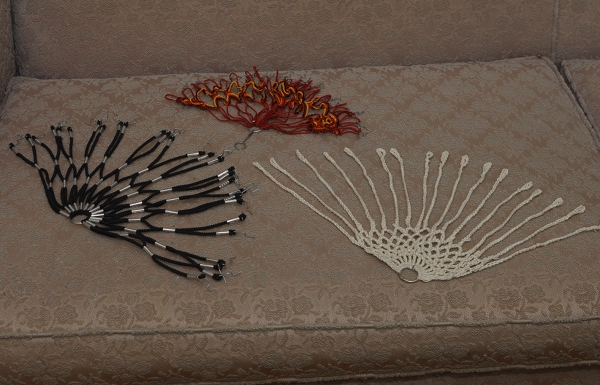
I love the look and feel of woven dress guards. To me they seem more graceful than the solid vinyl type - allowing for the wheel's spokes to remain visible, while still protecting clothing from flying into them. They can also give a bicycle more "personality," as there are many patterns and different installation methods to choose from. A year ago, it was almost impossible to obtain dress guards like these without making them yourself. However, now there are several options available and I have done my best to get my hands on them.
Some of the most beautiful woven dress guards available today are these handmade ones by
Bobbin & Sprocket. They can be crocheted in different patterns, according to your specifications (you can see them
here on
Bobbin & Sprocket's own bike and
here on an
ANT bike). I ordered a set for my mixte a couple of months ago, but have yet to attach them - because I've decided to do a drilled-fender installation, rather than use the clips provided. The clips don't attach securely enough for my fenders - and I am weary of having the guards fall off and get tangled in my wheel spokes. Earlier, I reviewed the Dutch
Simeli dress guards, and clip and fender compatibility was also a problem (they only work on bikes where there is a lot of room between the fender and the tire).
For these reasons, I don't think clipping woven dress guards to fenders is the ideal solution, and suggest the traditional drilled-fender installation instead. I had this done to my vintage
Raleigh DL-1 last year, using a
simple set of dress guards that a reader had sent me from Portugal. The fancy ones in the picture above were a gift from a friend in Autsria, and are waiting for the right bicycle.
The ones I decided to install on my
Gazelle were this set I bought from Mike Flanigan of
ANT, who has recently begun to order them from Europe. They are simple, stretchy and durable, and I thought the colour scheme suited my
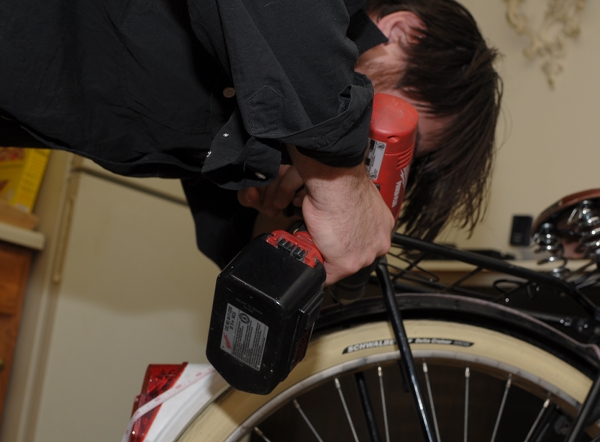
Gazelle nicely. Drilling fenders for dress guards may seem like a daunting task, but the actual act of installing them is not difficult, if you have a good drill. What's difficult is making the commitment: You can't "undo" the holes in your fender once they are there, and nearly every set of dress guards requires a different number of holes.
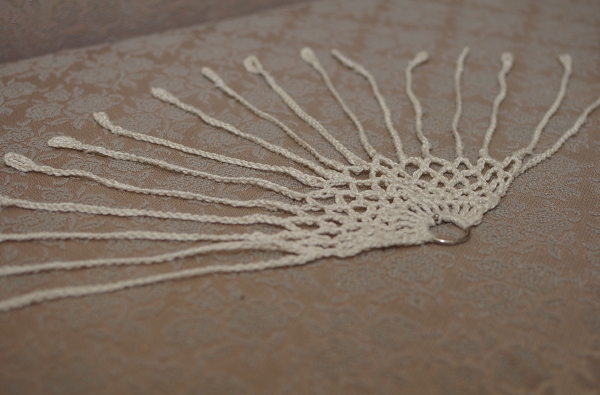
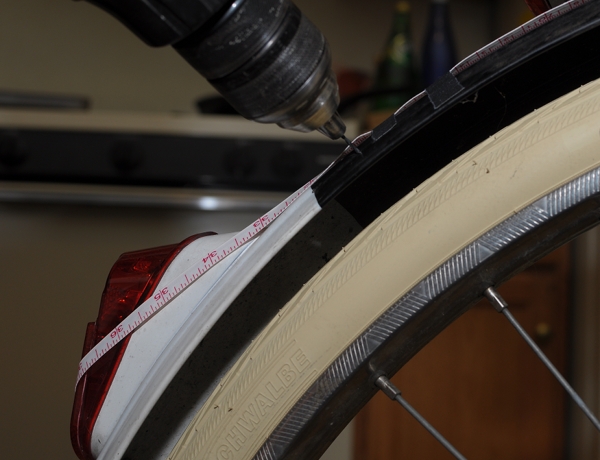
The first step is to consider what part of the wheel you want the dress guards to cover. There is no right or wrong in this regard: If you look at vintage dress guard installations, they are all over the place. Some prefer to cover 1/4 of the wheel, others prefer to cover the entire top half, and others still prefer something in between. Once you choose the coverage area, mark its beginning and end with masking tape. Then, evenly attach a tape measurer along this area. This will allow you to easily mark where the holes are supposed to be. The dress guards I used required 28 holes, which ended up being 1" apart.
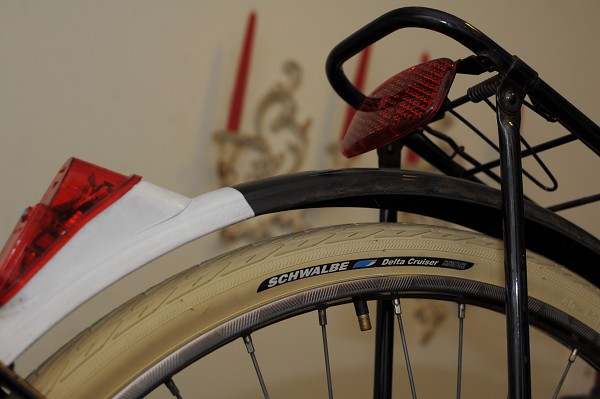
Depending on what bike you have, you do not necessarily need to remove the rear wheel or even deflate the tire when drilling the holes. On Dutch bikes and English Roadsters, there tends to be so much room between the tire and fender, that if you insert the drill bit as far inside the drill as it will go, it will be too short to reach the tire after piercing the fender.
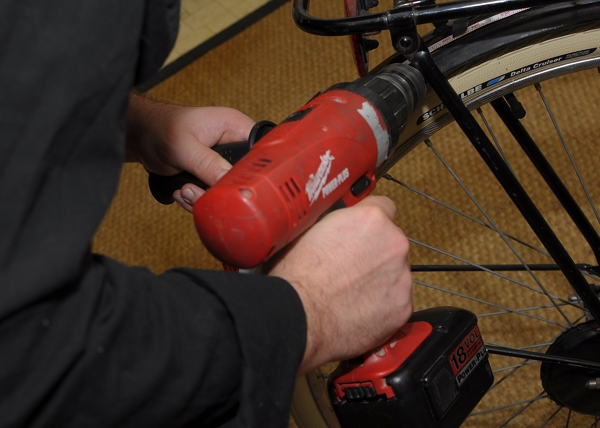
The hooks that come with dress guards are about as thick as medium-sized paperclips, so 1-1.5mm is a good size for the holes. We used a 1mm drill bit.
It is good to have a drill with a side handle attachment, as this allows you to keep your hands steady and to have more precise control over the drilling.
I would also suggest using a fresh drill bit and having a spare one before you start, in case it breaks.
And here we go!
If you measured correctly, the holes should look fairly even - but if not, don't panic. These things are meant to have a hand-made look to them and are forgiving of small mistakes.
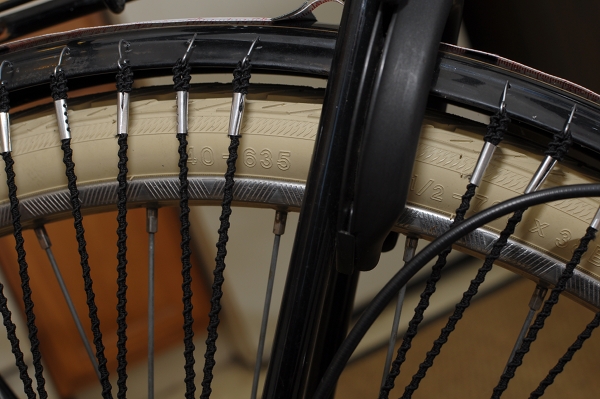
Inserting the hooks into the holes is fairly straightforward. One additional step to consider, is leaving room for the "cafe lock" if your bicycle has one. This should be done at the time you are measuring for holes in the first place.
At the drop-outs, the dress guards are typically attached to a bolt using a hook that is provided with the guards. (You will have to remove the nut, then insert the hook, then retighten the nut.) You may have to play around with how you angle that ring to which the cords are attached: The rack stays, the shifter cable and the hub indicator chain may interfere with it, and then you sort of have to angle the ring and insert it over/under, as applicable. Every bicycle is different in this regard, so it is impossible to give precise instructions here.
The important thing, is that in the end nothing sticks out in a way that can catch on your clothing. For example, we crimped the hook on which the ring rests, downward.
And that is pretty much it. Describing the process step by step in itself makes it seem complicated, but it only took us an hour - which I think is good, considering that it was our first time and we were afraid of messing up. You can see the finished installation in an outdoor setting in
this post. Looking at the final result, one could say that these guards could look better if they were fanned out over a wider area - but I wanted the coverage to be denser. It's really a personal choice, and I am pretty happy with how mine have turned out. If you own a drill, this method of dress guard installation is worth considering.


The dress guard from your friend in Austria looks ready for a German-themed bike!
ReplyDeleteExactly : ) Or rather, and Austrian Waffenrad. There is a frame just like my Jacqueline waiting for me in Vienna, and some day I will bring it back to Boston and build it up!
ReplyDeleteI think you fanned it out just right. It ends right where the white on the fender begins. It looks beautiful! Perfect! You and Mr. Co-Habitant are a great team!
ReplyDeleteMight you consider giving your Co-Habitant a name, a pen name or stage name? It doesn't have to be his real name.
Velouria -- You should add a little part about using a center bunch to mark off the holes. Using one makes it much easier to drill perfect holes.
ReplyDeleteLooks great- I've been thinking of putting some on Gilbert, but need some in a neutral color- maybe can get some from Bobbin and Sprocket in a silver color?
ReplyDeleteA drilling tip for people who don't have as much clearance as you- Any hardware store will have a "stop" a little thing that actually fastens onto the drill bit so that it's impossible to slip and go way through what you're drilling into.
I don't think I can bring myself to drill the Retrovelo fender. Maybe my old Raleigh Sports, though.
ReplyDeleteJust something to think about, masking tape or similar tape on the area to be drilled stops some but not all of the paint from chipping. This is not so much a problem with newer urethane paints but with lacquer or old enamel.
ReplyDeleteJim - He posts as "MDI" in the comments here, and also on Boston Retro Wheelmen.
ReplyDeletelyen - It took me a while to figure out what a "center bunch" was : ) We actually did not use a center punch here, and I wouldn't say it's strictly necessary - but to each their own method.
lukeofny- On the one hand yes, but on the other hand it can make the drill break or gunk up. I've experienced that with masking tape when drilling for other projects.
cycler- That's a good point about the drill stop! I think that Amy on Bobbin and Sprocket can prob get whatever yarn/cord you'd want. She has a blog, so you can ask there.
Lynne - Likewise with the fenders on my Bella Ciao!
Road bikes tend to have tight fender clearances, but fortunately they are also not equipped with chain guards, so taking the rear wheel is the best approach for those bikes.
ReplyDeleteVintage Raleighs, modern Pashleys and apparently Gazelle (don't know about Retrovelo) have 1/2" or more of clearance, and you only need maybe 5mm of drill bit poking out of the drill to do the job. It also makes it harder to snap the bit.
Some parts of the fender are inaccessible due to the rack stays and require the drill to be held at an extreme angle. Leave those for last since there is a chance you're going to snap the bit drilling into metal at a sharp angle. Have spare bits, obviously. A side handle for the drill is a must since you can rest your hand firmly on the rack while holding the drill in place. In fact, I would NOT attempt this job with the drill unsupported--you'll end up with scratches and uneven holes.
In order for the bit to not jump around, start squeezing the trigger very slowly with the bit contacting the fender and pressing in gently. Spin up as you maintain control of the drill. I think proper drill technique is outside the scope of this discussion, but it's really not THAT hard to drill the fenders whether you have a modern or vintage bike. It only sounds scary. Once you have the dress guard in place, nobody can see the holes.
Personally, I still prefer the solid vinyl for male bikes, so will be keeping mine on the Pashley. But if your bike came without any dress guards, this is really an awesome, cheap and relatively easy DIY upgrade that will make the bike stand out.
How exciting that you will get to build up a Jacqueline twin! I'm definitely looking forward to following that project. :)
ReplyDeleteFender drilling still makes me just a bit faint, especially when I think of it in regards to the new Pashley. I wonder if an old Raleigh sports fender would fit on a Princess Sovereign. I've got a spare one of those and wouldn't mind drilling it for the Pashley.
cycler - Like Velouria said, I can provide just about any color imaginable, and can make them for both drilled and non-drilled fenders. :)
Chuckle!! :)) The way these "guards" are laid out for display make me think of American Indian thread/bead work. Nice, very nice.
ReplyDeleteAmy - What do you make the clips for the fender holes of? Do you think that unraveled paperclips would work?
ReplyDeletePaper clips would be too soft. We need to get the special hooks that the italian guards have. I am sure they have a name, and I am sure someone sells them.
ReplyDeleteToo soft for what? You mean, you think they will bend and change how tightly the cords are stretched?..
ReplyDeleteWalt D - They remind me of those, too. I love the handwork on the elaborate ones.
MDI is right. The metal in paperclips is soft tempered, so they would just end up un-bending themselves after awhile under tension. I've been looking for the hooks used on the Italian guards with no success. Yet. I'll let you know if I come across any.
ReplyDeleteArgh! You people and your knowledge of metals : ))
ReplyDeleteHow do you deal with rust issues around the holes ? I guess that on such exposed parts of a bike, un-protected metal should start to rust pretty soon.
ReplyDeleteO.K. MDI it is. I, of course, was thinking something like "Crazy Horse" the great Indian Chief who in 1876 gave Gen Custer his "Comeupance" at the Little Big Horn. I have always liked that name. :^)
ReplyDeletephilippe - I don't know yet, and good question. But oddly enough, I have not seen much rust around the fender holes of vintage bikes.
ReplyDeleteI've been thinking about doing this to my Raleigh Roadster since I got her a few months ago, and figured that there was enough clearance to safely drill the holes without removing the wheel, but your post and MDI's additional tips make me far more confident to attempt this now. The bike's so god damn sturdy and indestrutible seeming that I didn't have any qualms about drilling per se, but I can understand others feelings about attempting this on a Pashley or Retrovelo! :)
ReplyDeleteI love the utilitarian look of the skirt guard from ANT which, live your Gazelle, I think would suit a Roadster well. Until now I was thinking I'd have to come up with something handmade, and of likely dubious aesthetic charm... I'll have to find out if he can post one to London or would let me know of a European source!
I do also love Bobbin and Sprocket's elegant crochet guards.
Does anyone make a fabric dress guard that has the two sides attached? Instead of clips or holes and hooks, the tension over the fender could hold it in place. I suppose over time with vibrations it may slip, but a small rubber tube or something to give it grip could be used.
ReplyDeleteWade--you could attach the two parts with string at each point. But it would surely slip, unless you also tie each point to a string running along the middle of the fender from tip to tip. However, with all those strings, it may not look so great and there is the issue of securing the string at fender tips.
ReplyDeleteFor some reason everyone seems to think that drilling the fender is a compromise of some kind. It's been done for 100 years, if a better system was apparent, it would have surely been invented by now, right? :)
Clare - The Simeli dress guards (linked in the text of the post) are available in the EU, they ship from the NL.
ReplyDeletePS: I have a group on flickr where lots of vintage dress guard pictures are posted, for those looking for pattern and attachment ideas.
Those are stunningly beautiful design for a bicycle owned by a lady. I must say that it is fashionable for its uniqueness. Love it.
ReplyDeleteVelouria : I guess that factory drilled fenders on old bikes have been painted after drilling, no before.
ReplyDeleteIf the idea of rust worries you, before inserting the clips you could try to touch every drilled hole with clear nail polish on the inside of the fender (or even use real paint).
ReplyDeleteHow do you go about ordering one?I did not see any on Ant website.
ReplyDeleteHope this is not too ignorant of a question?:)
Leeann
Those are beautiful!
ReplyDeleteMy one concern would be that the netting is too far apart to work for the biggest reason I like my dress guard: keeping various strings and ties hanging off packages on the back rack from getting twisted in the tire. I like being able to haphazardly throw stuff back there and not worry too much about it. While this skirt guard would minimize the risk in that situation, it would not be as effective as a solid guard.
In the blizzard going on right now in Chicago, I learned the hard way that the vinyl skirtguards on my omafiets are not ideal in all conditions. In the incredibly strong crosswinds, they contributed to the back of the bike sliding out sideways a lot. The streets were very slippery, the winds steady at 30mph gusting to 50mph (sometimes I could barely push the bike) and the bike was hard to control. I removed the skirtguards (and front basket) as soon as I got home and we'll see how tomorrow goes. I don't really need skirtguards on a regular basis (I've only worn a kilt once), but if I want to replace them, I'll definitely use a woven version.
ReplyDeleteDan.
I was freaking myself out thinking about drilling holes in my fender, BUT then I realized that I could use black or silver colored binder clips such as http://www.staples.com/Staples-Satin-Silver-Metal-Binder-Clips/product_481323. Small binder clips can be easily attached to the fender where the holes would be. Voila!
ReplyDeleteAmy with Bobbin and Sprocket made me beautiful off-white elastic dress guards and I took them to my bike shop yesterday and gave them this page as a reference as to how I would like them to drill the holes in my fenders. Thank you for the reference material and for showcasing Amy's work. She was a dream to work with and went out of her way to find off-white elastic and silver hooks for me.
ReplyDeleteHi, was just wondering if it's possible to make your own dress guards as i have an old vintage bike that came with some very old dress guards, half of which were missing. I have bought new elastic to make them, but just wondering whats the best way to go about it all. I like the style of the ones you chose to put on your Gazelle. Otherwise i was just going to go for the simple option.
ReplyDeleteI would make a few recommendations while working on this project:
ReplyDelete1) After marking the fender, remove it. Doing the drilling on the bike risks putting holes in the tires...crap happens.
2) On old bikes (like my mom's) I remember seeing brass grommets in the steel fender. This reduced the stress on the laces of the guard, in her case a canvas one. The fender itself can be rather thin metal, and could conceivably chafe the cords.
3) I am in the process of making up a set of flat bent-wood fenders for SWMBO's bike, and skirt guards will include the aforementioned brass grommets. They will be clear lacquered after install to reduce blackening from tarnish.
I will also be making a chain guard for her bike (and coaster brake Huffy of recent vintage), I'll be making a full guard.
You may contact me at grrimm [at] juno [dot] com.
BTW, anyone in the Boston area interested in a Srping Tweed Ride?
Are bracket and clips made of stainless stell?
ReplyDelete