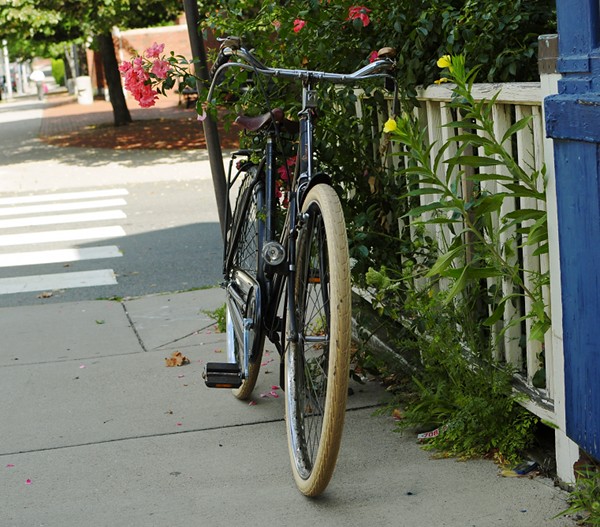
Behold my beloved
Raleigh DL-1 Lady Tourist! Lovely as usual, is she not?
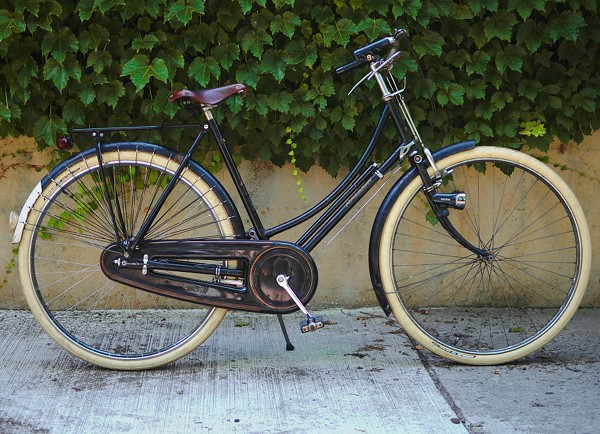
Ah, but some things about her are not at all "as usual". Can you tell that the lady has had major surgery? Probably not, and that's the beauty of it; her classic roadster features have been left intact.
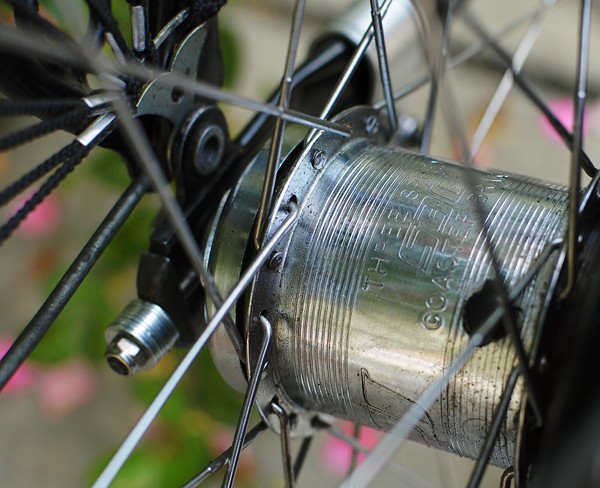
But oh, what's this here? Why yes, it's a
Sturmey-Archer S3C coaster brake hub! And with it, the bicycle has been magically transformed to an unmatched state of fabulousity.
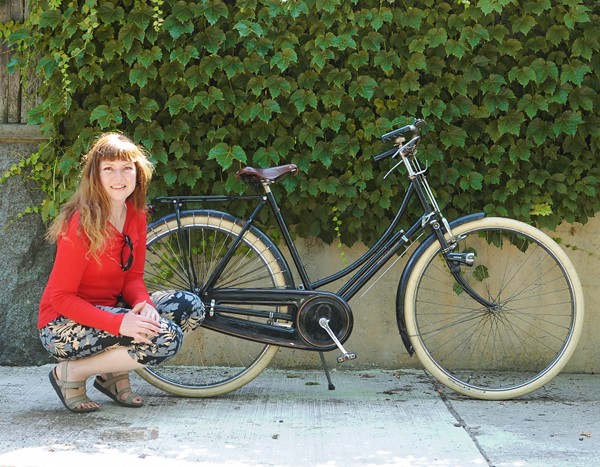
For those unfamiliar with the saga: The
Raleigh DL-1 is basically the holy grail of vintage "Roadsters," particularly the lady's loop frame. These bicycles are elegant, comfortable and surprisingly fast. There is only one tragic drawback: They were made with rod brakes, which is a braking system that is not the greatest even in dry weather, and completely ineffective in the rain. I
got my DL-1 last summer and it has been my preferred bicycle ever since, despite the poor braking power. Still, I hoped that someday a conversion to a more effective braking system would make it perfect. Imagine my elation that this day has come!

If you are wondering how we did this, I will first say that it is definitely a "don't try this at home" project unless you are mechanically inclined, or have a spouse who is. But to summarise: You will need to get a 3-speed coaster brake hub and to have a new wheel built around it. You cannot put the coaster brake hub in the old wheel, because these hubs were designed for a different number of spokes. If you are planning to keep the original rod brakes (which you have to, unless you want to replace the handlebars), the new wheel needs to have a 28" rod-brake rim. These are distinct from regular rims, in that they have a special notch for the rod brake pads to grip.
Yellow Jersey sells these rims, and they can also build you the wheel if you send them the coaster brake hub.
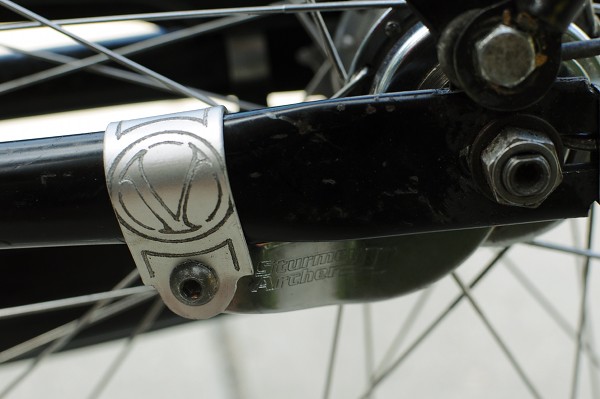
And that is what we did: I got the hub from an acquaintance who happened to have one (and who sent this monogrammed reaction arm clamp to go with it!), and had the wheel built by
Yellow Jersey. Upon receiving the new wheel in the mail, we stayed up half the night attaching it to the bike. There are various little nuances that made it, shall we say, challenging - but it is doable. I will post a more detailed account on
Boston Retro Wheelmen soon; for now I still have PTSD from the process. But let's be frank: A mild case of PTSD is a small sacrifice for the miracle of a secret coaster brake on a classic rod-brake roadster!

After the coaster-brake wheel installation, I spent the following day riding the bike everywhere; it was difficult to get me off of it! I tried hills, high-traffic routes, bridges - all kinds of situation where the brakes would be put to the test. I even got stuck in the pouring rain on my way home from downtown Boston - which was not intentional, but perfectly timed for testing the brakes in wet weather. If you've been reading this blog, you know I like coaster brakes, and this one performs fantastically. Upon back-pedaling, it comes to a soft (non-jolting) but reliable stop, making hand braking completely unnecessary, other than for preventing the bicycle from rolling when stopped at a traffic light. One funny thing about this hub, is that it is very-very loud: a steady ticking noise when pedaling, amplified tenfold when coasting. Well, at least they can hear me approach!
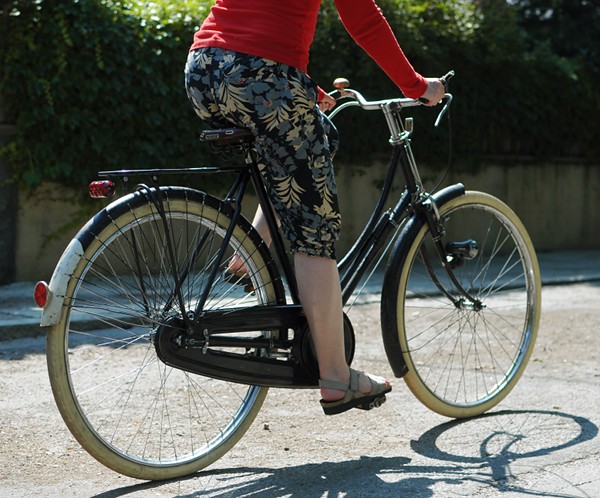
It did not take me long to get used to the DL-1 having a coaster brake and to adapt my braking patterns accordingly. With the rod brakes, I used to plan my stops in advance and I feared rain. Now I am free from worrying about such things and can fully enjoy this wonderful bicycle. There are other ways of installing effective brakes on the DL-1, like attaching the rods to a rollerbrake hub or replacing the whole rod system with standard brakes and conventional handlebars. But I chose the coaster brake, both because I like the system in itself, and because it allowed me to preserve everything about this bicycle exactly as it was - making it my very own Coaster Roadster.
 Behold my beloved Raleigh DL-1 Lady Tourist! Lovely as usual, is she not?
 Ah, but some things about her are not at all "as usual". Can you tell that the lady has had major surgery? Probably not, and that's the beauty of it; her classic roadster features have been left intact.
 But oh, what's this here? Why yes, it's a Sturmey-Archer S3C coaster brake hub! And with it, the bicycle has been magically transformed to an unmatched state of fabulousity.
 For those unfamiliar with the saga: The Raleigh DL-1 is basically the holy grail of vintage "Roadsters," particularly the lady's loop frame. These bicycles are elegant, comfortable and surprisingly fast. There is only one tragic drawback: They were made with rod brakes, which is a braking system that is not the greatest even in dry weather, and completely ineffective in the rain. I got my DL-1 last summer and it has been my preferred bicycle ever since, despite the poor braking power. Still, I hoped that someday a conversion to a more effective braking system would make it perfect. Imagine my elation that this day has come!
 If you are wondering how we did this, I will first say that it is definitely a "don't try this at home" project unless you are mechanically inclined, or have a spouse who is. But to summarise: You will need to get a 3-speed coaster brake hub and to have a new wheel built around it. You cannot put the coaster brake hub in the old wheel, because these hubs were designed for a different number of spokes. If you are planning to keep the original rod brakes (which you have to, unless you want to replace the handlebars), the new wheel needs to have a 28" rod-brake rim. These are distinct from regular rims, in that they have a special notch for the rod brake pads to grip. Yellow Jersey sells these rims, and they can also build you the wheel if you send them the coaster brake hub.
 And that is what we did: I got the hub from an acquaintance who happened to have one (and who sent this monogrammed reaction arm clamp to go with it!), and had the wheel built by Yellow Jersey. Upon receiving the new wheel in the mail, we stayed up half the night attaching it to the bike. There are various little nuances that made it, shall we say, challenging - but it is doable. I will post a more detailed account on Boston Retro Wheelmen soon; for now I still have PTSD from the process. But let's be frank: A mild case of PTSD is a small sacrifice for the miracle of a secret coaster brake on a classic rod-brake roadster!
 After the coaster-brake wheel installation, I spent the following day riding the bike everywhere; it was difficult to get me off of it! I tried hills, high-traffic routes, bridges - all kinds of situation where the brakes would be put to the test. I even got stuck in the pouring rain on my way home from downtown Boston - which was not intentional, but perfectly timed for testing the brakes in wet weather. If you've been reading this blog, you know I like coaster brakes, and this one performs fantastically. Upon back-pedaling, it comes to a soft (non-jolting) but reliable stop, making hand braking completely unnecessary, other than for preventing the bicycle from rolling when stopped at a traffic light. One funny thing about this hub, is that it is very-very loud: a steady ticking noise when pedaling, amplified tenfold when coasting. Well, at least they can hear me approach!
 It did not take me long to get used to the DL-1 having a coaster brake and to adapt my braking patterns accordingly. With the rod brakes, I used to plan my stops in advance and I feared rain. Now I am free from worrying about such things and can fully enjoy this wonderful bicycle. There are other ways of installing effective brakes on the DL-1, like attaching the rods to a rollerbrake hub or replacing the whole rod system with standard brakes and conventional handlebars. But I chose the coaster brake, both because I like the system in itself, and because it allowed me to preserve everything about this bicycle exactly as it was - making it my very own Coaster Roadster.

That is one beautiful bike!
ReplyDeleteThis is why I was so excited that we got the DL-1 with rod-operated hub brakes (aesthetics of the rod brakes, only they actually work), but I love coaster brakes as well, and this seems like a great solution.
ReplyDeleteWas the hub width the same as on the original hub?
Congratulations! I love coaster brakes for riding with drinks, umbrellas, cameras, etc. Makes it much easier to ride with one hand. May many years of blissful riding with your coaster brake be yours! :)
how great!
ReplyDeleteI do not love a coaster brake but in this case it makes the most sense for sure. Congratulations!
I also had the coaster brake done on my DL-1 (getting the idea for it from you) but no PTSD as I am mechanically challenged and know my limitations. The coaster brake is the ticket for this bike and as much fun as I remember on those bikes of childhood. Thanks for a fun update on your DL-1.
ReplyDeleteMandG - Thanks! This is the same bicycle as on the banner. Such classic perfection!
ReplyDeletePortlandize - The bicycle is c.1973 and the new hub c.1986; it was a bit wider than the original and we had to spread the dropouts, which was part of the challenge I spoke of!
Anonymous - Cool! What hub did you use?
Excellent news!
ReplyDeleteI assume that the hub is a vintage model- did you oil it? Yellow Jersey *probably* didn't, so as not to get the wheel all messy from leakage during shipping. A few cc's of your favorite Sturmey tipple will make for a nicely contented-sounding "tick".
(I realize I am assuming here, so feel free to correct me.)
Congratulations on performing such a subtly beautiful transformation on Velouria. She's a true standout among loop-frame DL-1s now.
Your labor of love reminds me of people whose subtle updates to their Colonial or Victorian houses retain period charms while allowing modern usage. Well done!
ReplyDeleteCorey - It was more complicated than that. Yellow Jersey sent the wheel back to the person from whom I got the hub, as there were some mysteries about the hub that surfaced once the wheel was put together. By the time I got the whole thing back from him, it was all oiled -though not messy. We may oil it some more.
ReplyDeleteYay for the DL-1! Glad to see it make a another appearance on your blog.
ReplyDeleteAnd yay for more stable breaks!
:)
Veloruia,
ReplyDeleteThank you!!! I am doing coaster brakes on my DL-1 in October and though my super bike mechanic is going to do it all for me I'm so happy that you are happy with your conversion!!!
If you know come upon anymore of those 3speed coaster brake hub please feel free to pass along my email address..Super Bike Mechanic can do all the wheel building etc. for me:)
very cool upgrade! i know you've thought long and hard about how to improve the braking on your DL1, and it sounds like this was the key. did you leave the rear rod brakes intact?
ReplyDeletei often wonder what i will do with my DL1's brakes to improve their performance... for now, i guess i'll just stick with planning well in advance for braking, and hope for the best!
as for the loud ticking-- that may be a symptom of being in need of additional oiling. i happen to know of a nice solution to getting oil into the hub without making an oily mess.
girlcanbike - The vintage S3C hubs are very hard to come by, took me months. However, you can install a modern one and those are of course easy to find.
ReplyDeletesomervillain - both front and rear rod brakes are intact and fully functional in addition to the coaster brake; it is really a great system now. I meant to demonstrate the hub for you the other day, but it was so hot I forgot about it; would love to see what you think next time.
Velouria~
ReplyDeleteThanks for letting me know...just figured I'd put out the feelers in case you stumble on one in the future or that someone reading this post does:)
I dont mind putting in a modern but of course a vintage would be better..
Take Care
Fi
that looks like one sweet ride. i was thinking about trying to get a vintage bike here in Japan and fix it up, but I don't have all the knowledge you do so I'm not sure I can do it.
ReplyDeleteYour bike is really looking beautiful!
Velouria, we used a new Sturmey-Archer AWC 3-speed hub with coaster with Yellow Jersey's 36h rim, preserving the rod brakes and the overall vintage look. Added a 22 cog for the hills where I live, a new Brooks 66L and an Old Roads pump, new tires, and of course just a general overhaul for this 1977 model that had been in storage 8 years but showed little use overall. Still need to get a rear reflector and an appropriate rack. Looks great now; the bike shop indicated they were happy to just have her hanging around to look at. She is a looker for sure. BTW, I emailed my sister the cute photo of you with your DL-1. Fun. Thanks again!
ReplyDeleteHooray! Velouria and Velouria look amazing and so happy together!
ReplyDeletePerfection! A reliable braking system will change your life with this bike. My roller brakes are reliable and work perfectly in rain and snow, but I still want coaster brakes to go along with them. I don't know if I'm willing to go through so much trouble for it, since my current braking system is very good. But since I plan to keep my baby girl forever, maybe it is worth it. I love how, when you get a bike idea in your head, you really go for it!
ReplyDeleteSweet reaction arm clamp.
ReplyDeleteWow, really nice Raleigh. Good solution for improving the bike's performance while preserving its vintage character. The PTSD will probably subside after a few rides I'm sure.
ReplyDeleteI'm guessing your troubles were with adding rear hub axle spacers and compensating for changes in chainline?
I also like the arm clamp.
You have not mentioned yet that you also installed a rack! it looks great. I had a moment this morning of nearly plowing into the side of a BMW who did not see a problem creeping in front of me as it wanted to turn right just as I was exiting a busy trail under my right of way. It was raining, and the brakes were not working well at all. I shouted my head off and fortunately did not have a collision. I too, would like to find a good braking solution. I am still hoping for some alloy westwood rims (maybe + coaster brake too), hmmm.
ReplyDeleteSince some of your other readers are expressing interest in doing this, I'll add a few technical comments.
ReplyDeleteBriefly, you need to rebuild the wheel around the new hub because you can't put the S3C internal gears inside the AW shell. The number of spokes should not be a problem unless you are unable to find a S3C hub with holes to match your existing rim. Otherwise, you can rebuild your wheel with your existing rim and S3C hub. I would expect this to require different length spokes when you change hubs, so you would have to buy new spokes to do this.
Sturmey Archer made S3C hubs with 36 and 40 holes, both useful for a DL1; make sure you have a rim to match your hub.
The coaster brake hubs have heavier shells than the AW/FW/S5 shells since the coaster brake shells have a braking surface. As a result, you can't put the S3C internal gears in the existing AW shell. This is why you have to rebuild the wheel.
(The 4 speed FW and 5 speed S5 both use the same shell as the AW, so you can keep your existing rim, spokes, and hub shell and just replace the internal gears without rebuilding the wheel. This is especially useful for S5 or FW hubs with 28 holes.)
I did not know the S3C was wider and required spreading the frame - thanks for the information.
Stephen - Thanks for the additional details. I will add also, that while it is possible but difficult to find an S3C hub for 36 spokes, the chances of finding an S3C hub for 40 spokes are entirely unrealistic; so count on building a 36 spoke wheel. I am also not sure it is necessary to look for a vintage hub, and perhaps a modern one would be better. I've had good experiences with vintage hubs compared to modern ones, but this is a bias that I am beginning to rethink when it comes to 3-speeds. According to the specs, modern 3-speed hubs are much more widely spaced, which could be a great help if you live in a hilly area.
ReplyDeletehrm- I could have sworn I commented.
ReplyDeleteanyway- I think this rocks. I would love to see how coaster brakes feel differently on a two wheeler.
How exciting! I'm looking forward to hearing more about how much you love riding her with her new brakes. I'm just going to continue to be envious of your DL-1 and the DL-1s of others since I'm coming to the conclusion that I'm just too short to reach the pedals on these beauties. :)
ReplyDeleteNow I want the same rack for my DL-1. But not a coaster brake. I'll put new brake pads on and see how that is.
ReplyDeleteFor those who don't like coaster brakes, the remaining option is to install a modern brake/dynamo combination front hub. The rear wheel can be made "good enough" with rod brakes.
ReplyDeleteSo, one way to do it would be to get a new SA front drum brake dynamo hub (used on Pashleys) and rebuild the front wheel with existing rim--I think the spokes match. There are a few issues, some of them difficult:
1. how to attach a modern lined brake cable to the end of the rod so that the front of the bike still looks authentic;
2a. how to attach the end of the modern lined brake cable and adjustment nut to the fork blade near the hub, and
2b. the same clamp could be used to attach the reaction arm of the hub to the fork blade;
3. finally, whether to keep the front rod brake pincher/fork/holder and fork clamps, which are a very prominent part of the DL-1's front wheel, disconnected but equipped with brake pads, for authenticity.
So, in a way, it is a more difficult project than swapping for a coaster brake.
I would like to see detailed pics of the rare vintage DL-1 with hub-rod brakes. The front wheel assembly, head tube and rods. If anyone has one and can post pics on flickr, it would be marvelous.
By the way, I love the word "fabulousity", thanks for that one :)
ReplyDeleteMDI: Regarding the DL-1 with rod-operated hub brakes... hope these will be helpful. Our DL-1 has the hub brakes, and just has standard single-walled rims (so you couldn't use caliper brakes or standard rod brakes on them)
http://www.flickr.com/photos/poetas/4525070102/
http://www.flickr.com/photos/poetas/3755763635/
http://www.flickr.com/photos/poetas/3756563544/
http://www.flickr.com/photos/poetas/3755763267/
Velouria~
ReplyDeleteIs it ok for me to email you directly with a coaster brake hub question and to have you check out a specific one for me to see if it would work. I thank you in advance...I know you are a busy person so no worrys if you'd rather not:) Ooorrr you can check my blog and I'll have my question on there too ..that actually may be easier for you
Take Care!!
Fi
That bike is sooo you!
ReplyDeleteMDI - new brake pads won't help you in the rain though, so don't be hating on the coaster.
ReplyDeleteportlandize - Thanks for the pictures!
Fi - sure, though I can't guarantee that I can answer it : )
Ah, so the rod system never touched the front fork at hub level. Interesting. There is a pivoting lever that converts vertical pull at the headtube level to vertical pull along the fork blade. It could also function as a lever, trading travel distance for force. Not really possible to replicate w/o authentic Raleigh components. But an all-rod-no-brake-cable system looks so much better than what I described in an earlier comment, and preserves the authentic rod-brake look.
ReplyDelete@MDI: Some modern Gazelle bicycles (the Toer Populaire particularly) still use this same system, using Sturmey Archer hub brakes with rods. We actually had to replace the rear hub on this bike, so it has a modern Sturmey Archer rear hub, and actually a Dutch 28" rim, which is just slightly smaller than the original Raleigh rim, but aesthetically similar.
ReplyDeletePersonally, I love this setup. The brakes work well (maybe not as well as disc brakes, but better than the caliper brakes on my older Raleigh), and I love the look of the rods. It's a great system.
Thanks, portlandize.
ReplyDeleteI meant to refer to the modern Gazelle as an example of excellent use of traditional rod brakes. It's an elegant system, slightly spoiled by the fact that the rods are not independent. This complicates adjustment and does not allow one to pick which brake to use (important in the winter and other conditions).
I saw these Toer Populaires in Club Monaco last year, but knew much less about bikes at the time. For example, I don't remember if the lever system was "splittable." The demo bike was out of adjustment and essentially had no brakes.
@MDI: I don't know about the Gazelle for sure, but the rods on the Raleigh operate independently of each other. That is, I can engage the front brake without engaging the rear brake, and vice versa. They can also be adjusted independently, using twisting nuts which attach the rods to the lever on the hub.
ReplyDeleteI've seen a Raleigh with the typical rod brakes (like Velouria's), and the rods were independent on it as well.
Hi -- Long-time reader, first post-time poster. I love your site; of the many bike blogs out there, it's one of the few that I look for new content daily.
ReplyDeleteAnyway, I have an early 70s DL-1 which I purchased a couple of years ago. It came with a TCW-III coaster brake hub, stamped August 1963 (perhaps the previous owner had the same concerns you have.) It's a good idea, since sometimes you need both rod brakes and coaster brake to stop in a reasonable distance.
http://www.flickr.com/photos/30490050@N04/sets/72157607294694455/
Robert - Wow, that is too cool, what a great find! I hope you ride it? I am so comfortable with coaster brakes that I hardly use the rod levers - though they are convenient for keeping the bike steady as I try to balance on it at a stoplight.
ReplyDeleteI also like coasters, but on older hubs I've used, they are somewhat weak... What about this?
ReplyDeleteFrom newer I have used Shimano Nexus SG-3C41, it was quite sharp and somewhat difficult to feel how hard I need to push (but on 20" wheel, maybe with 28" is better).
About particular wheel in picture- I see, no washers are used under spoke heads and spoke "loops" are quite far away from hub flange- this leads to spoke breakage sometimes. Reason IMHO is that most spokes are made for aluminium hubs which have thicker flanges than steel hubs. I just faced this with Nexus 3 hub and Sapim niro spokes- I had to use at least 2 washers under spokes head.
But not all spokes are like that, Aplina and DT Swiss was ok with one washer.
ps. your site is great, I'm reading with interest. :)
Anon - For me, it's not so much that the old hubs are weak, as the new hubs are too jolting. The modern Shimano 7 speed coaster brake on my Pashley stops rather sharply and I have to moderate it. The 1980s coaster brakes on this DL-1 and on the Steyr Waffenrad I ride in Austria are just perfect. They are not so much weak, as soft, and I have been able to do emergency stops on them just fine. But I think this is a matter of taste, and I can imagine that some would prefer the sharper stop.
ReplyDeleteVelouria, well, you said more exact about old coasters- they are softer, that was more I thought. And when pushed hard, they also can stop quite ok- at the moment I'm riding Sachs Duomatic (who have not tried this hub, do so, very nice to ride in city, sad, nothing similar is made today, but used still can be found in good shape, these are pretty strong hubs) hub and I can live with it... ...and for more confidence I built a wheel with roller brake in front. :)
ReplyDeleteMartinss (last anon post is also mine)
Question re coaster brake conversion--do you know if the coaster brakes on Raleigh 3-sd Sports would fit the DL-1? they are rather easy to find at least used but I have not been able to determine which one was used and what the issues might be.
ReplyDeleteAny other 3 sp coaster hubs that would work? ideally without having to widen the forks to make them fit?
I want to put a coaster brake hub on my 80's vintage Raleigh with rod brakes (basically, it's a Raleigh Sports with 26-in wheels but retro DL-1 syle accouterments, including chaincase and rod brakes). The problem? The generator is inside the rear hub, not the front, which means I need to find a three-speed coaster brake/generator hub. Is there such a thing? The current Sturmey-Archer catalog doesn't list one, and neither do the older ones I've seen. The alternative is rewiring the electrical system, which runs inside the tube, and which configuration I really prefer!
ReplyDeleteI hope you are still watching this post. I love the idea and plan to do the same to my 1973 Tourist. However, I couldn't find the post on Boston Retro Wheelmen about the process or your troubles. Do you have a link? Thanks and again, love the idea.
ReplyDeleteHello, lovely bike you have. I just got a DL-1 loop frame and making my mods, eventhough I would like to keep it original, my wife wants some modern touches. I have not been able to locate a clean rear rack, your has a clean look to it, could you please tell me what brand is that? Thank you much.
ReplyDeleteAriel